Lab @11 : nude pantyhose utility lora (+ a bit nsfw style)
Details
Download Files (1)
Model description
intro.
lab 11 is the series of LoRA, it is meant to be a "UTILITY" LoRA for me to fix and enhance dataset for training lab 10. however, I found it's ok to use alone, so feel free to help yourself.
SIDE NOTE : The nude / sheer style pantyhose is not as EASY as I expected ...
A tiny color different and detail loss will make it LOOKS UGLY 😅
And interestingly, quite a lot of base model, tends to generate pantyhose in certain common style ( e.g. black pantyhose ), so it's a bit tricky and difficult to teach it to correct the detail and colors. I can't really tell the key elements yet, just got this raw idea.
Though it's not that easy, it's a good training topic that you can have a try to see how to gradually bake a LoRA from scratch, and get some idea of making it better and better
Try training your own ~ it's fun, and easier than your can think of
There's one way I would recommend you trying :
You can use some existing LoRA from civit, tweak the prompt and get a set of dataset ( and remember to highres & adetailer face fix them ), and then do experiments ( feel free to utilize any of the series both 11-x and 10-x to generate batch dataset and try )
I will also upload the dataset of some of the LoRAs from time to time, feel free to simply grab them & modify & train
Changelog
250519
Uploaded LoRA 11-25, 11-27, 11-28 (based on janku v3)
Updated some thoughts & findings ( see below )
250430
Uploaded LoRA 11-02 (based on janku v3) & 11-03 (based on illustrious XL 0.1)
Updated — Several techniques to improve LoRA datasets:
Combining Utility LoRA's img2img redrawing method to reduce image chaos & improve quality
Removing clothing linesMaking wrinkles more naturalProcessing overly highlighted areas
Foot shape processing
see belows
250429
Uploaded LoRA 11-01 (based on illustrious XL 0.1, trained on civit)
how-to use
lab 11-28
trigger token : lrnude pantyhose or sheer lrnude pantyhose
you might need negative prompt :
oily pantyhose, pantyhose band, (black pantyhose), white pantyhose,
lab 11-27
trigger token is the same as lab 11-28
it's BAD, don't use.
lab 11-25
trigger token : lrnude, sheer beige pantyhose
you might need negative prompt :
oily pantyhose, pantyhose band, (black pantyhose), white pantyhose,
lab 11-02, lab 11-03 ( better, can be used alone )
model --
lab 11-02 => better use janku v3
lab 11-03 => maybe ok for all illustrious model
weight 0.5 ~ 1, step > 20 ( won't produce too much buggy result )
highres fix and adetailer is not a must
positive prompt & trigger token could be :
lrfixme,
hmmmmmm, it's meant to be a utitliy LoRA to fix images for lab 10, so I use a token like this
sheer pantyhose,
sheer golden pantyhose,
sheer xxx pantyhose,
sheer bodystocking,
high detailed skin,
(NOT TESTED) it seems can improve a bit details?
negative prompt could be :
pantyhose band,
personal taste, just for recomemdation
shiny, oily,
if you think it's too oily
dataset is attached as well, you can download and see :
how training dataset quality affects LoRAs, e.g. between 11-01 and 11-02
lab 11-01 ( bad, not recommended )
updated #250519
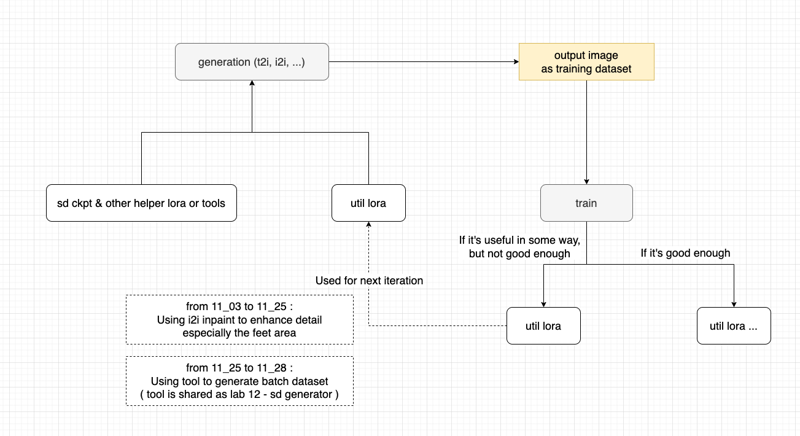
Thought (diagram) - creating Util LoRA to generate dataset for training
REMEMBER to check the text :
for captions
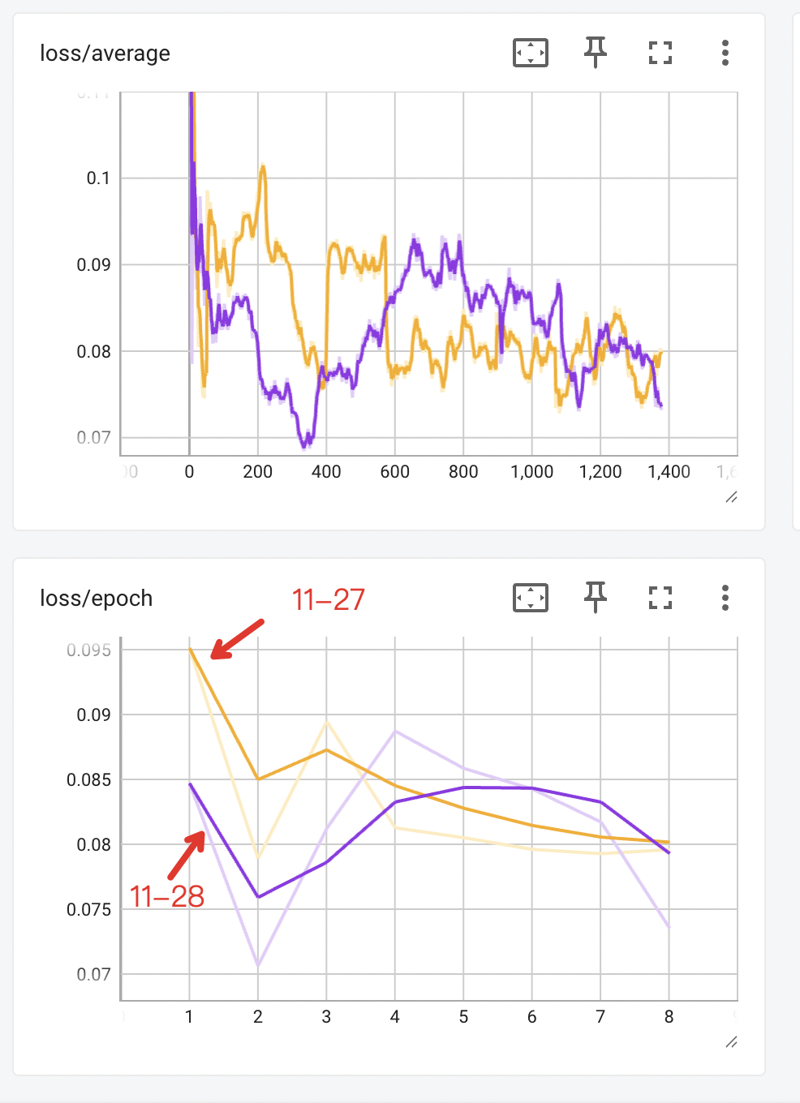
11-27 using
xxx_wordstyle ( using_"underscore" as separators )11-28 using
xxx wordstyle ( using "whitespace" as separators )
The finding is :
11-28 is better than 11-27 with the same set of dataset images
The training loss curves look like :
updated #250430
Share -- How to Use Utility LoRA & SD to improve dataset images for itself
Model Compatibility and Application Range
Before diving in, I'd like to share a finding: LoRAs trained on the base model illustrious XL 0.1 perform quite well across various derivative models based on illustrious XL. However, if trained on a subsequent branch model of illustrious XL, the applicability becomes relatively weaker. For example, you can compare with another version 11-01 based on janku v3 (janku seems to have evolved through illustrious → rouwei → janku).
Though it's not obtain the whole feel I want it to learn, but it feels more natural anyway.
Question: Why Use Utility LoRA?
First, why consider training a Utility LoRA?
Because the dataset was prepared recently (when I wasn't paying much attention to image quality), quality improvement was needed. For someone with basically no artistic foundation who only knows how to make simple modifications with basic drawing programs, what should be done?
I thought about using img2img for redrawing to improve quality (and if this approach works, it would be superior to purely manual image quality adjustments).
However, when using the base model or other models directly, I found that if the strength was set high, the desired characteristics in the dataset would be diluted; if set too low, it wouldn't achieve the desired image optimization effect.
After experimentation, I discovered that through certain processing techniques, even with just the base model or a previously problematic LoRA, image quality could still be effectively improved.
But after processing a couple of images, I felt this approach was quite costly since img2img strength couldn't be set too high, requiring more effort to make additional adjustments to see noticeable effects.
So I began to think: if I improved the quality of a small batch of images and used them to train a high-quality LoRA, although this LoRA might be mediocre for txt2img, it could perform reliably in img2img at low weights and low denoise strength, making image modification work easier.
That's the overall approach. So I trained such a Utility LoRA.
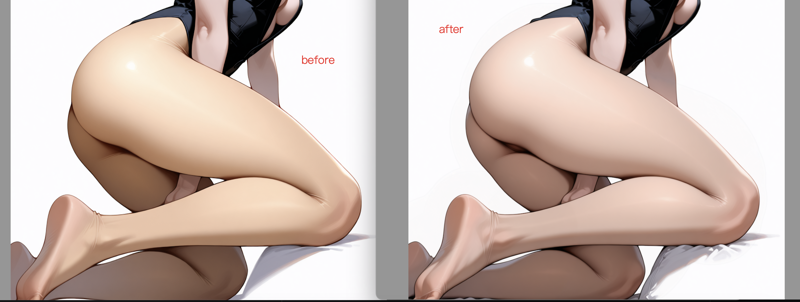
Here's an example of the effect after Utility LoRA repair (0.x strength):
First, let's see what's the problem -- here 's the original pic, the problems are as bellow :
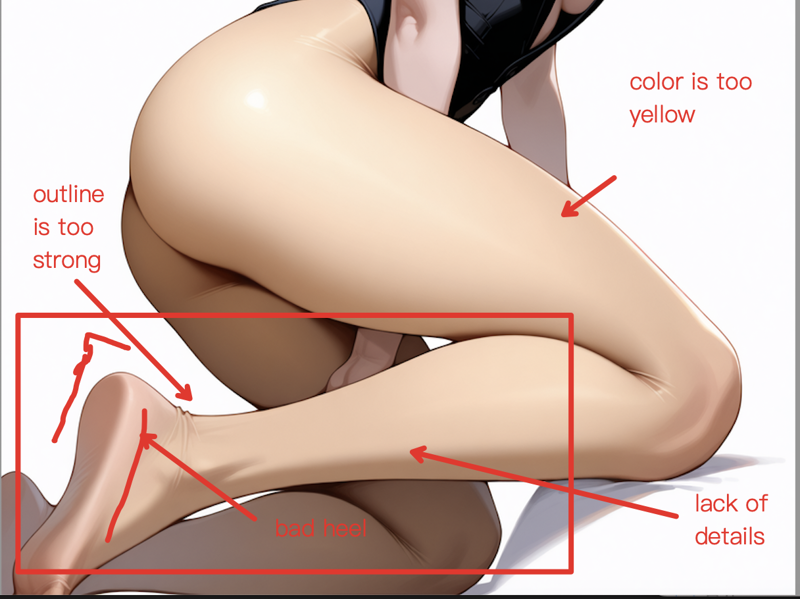
After three quick run with masking the legs ( using the Util LoRA with 0.2 ~ 0.4 strength ), we now get --
Of course, if features are very sensitive to subtle changes, such as comparing a specific humidifier to a general type, or a specific beautiful woman to a general type, this method may not be applicable.
Note: For the image processing mentioned below, I used the free online tool https://www.photopea.com/
Technique: Using Masks to Control img2img Areas
Use masks to protect target training areas, then apply img2img processing to areas outside the mask. This protects the content we want to preserve while letting well-performing models handle other irrelevant parts (with or without Utility LoRA, and even with adetailer ON ). In this case, higher strength can be used.
If the target training effect itself is of acceptable quality and doesn't need redrawing, after applying the above method, remember to use masks to define the edges of the target training area and apply low-strength redrawing with Utility LoRA to achieve better detail transitions.
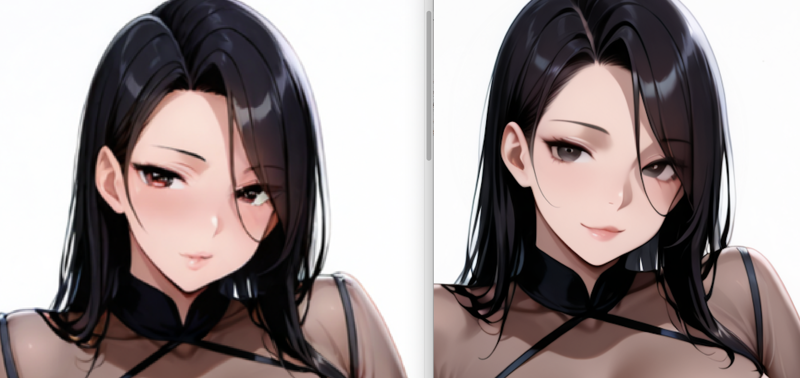
When the target area needs adjustment but doesn't particularly need image processing, you can directly use Utility LoRA for low-strength redrawing of the entire image (not even bothering with selection areas 😂), then use methods 1 and 2 as needed.
For example -- ( to avoid making this post NSFW, let us just compare the face )
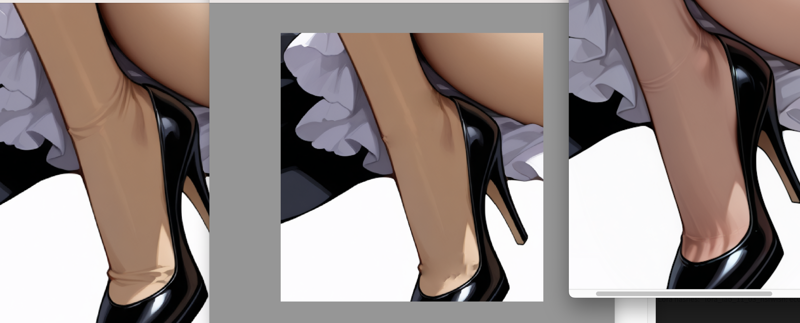
Technique: Changing Image Proportions
Based on previous training experience, here are several key points:
Try to provide images with consistent training dimensions
You can first process images at high resolution (maintaining the same ratio as training size), keeping all image optimizations in this large-size mode, avoiding frequent enlarging and shrinking
When processing is complete, uniformly reduce to training size using lossless methods, and remember to enlarge for viewing to ensure there's no color jittering (refer to findings from lab_10 training)
For example, to adjust images from 1024 × 1156 to 832 × 1216 ratio:
First, adjust moderately toward the target direction, then to the target ratio. Both processes should use extremely low strength (I used 0.01), which automatically fills in the extra areas.
Next, remove problematic parts in the drawing software, then import back and use masks to readjust the areas affected by the changes.
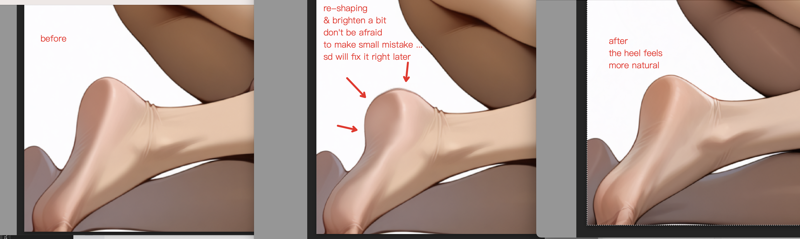
Technique: Using Liquify for Structural Shape Adjustments
Use the liquify tool for structural adjustments, such as the leg heel position. You can see some areas appear too "rectangular" - the heel should be more rounded and natural.
After drag adjustments, you get a more natural shape, then let img2img fine-tune and perfect it.
Technique: Detail Adjustments
For detail fine-tuning, such as reducing wrinkles and avoiding excessive highlights, here are three effective methods:
Color overlay: First create a transparent layer, then apply coloring with nearby colors, remembering to lower the hardness and transparency of the brush
Healing: Effective for areas that are relatively flat locally, the algorithm will automatically remove small wrinkles or spots after smudging
Blur and highlight: This method can be used on unwanted over-sharpened parts (like very obvious highlight areas); can also add low-transparency brightness to areas that need highlighting; can be combined with negative prompts like "shiny, oily" to control img2img from producing obvious oil-shine effects (sometimes oil-shine creates a plastic, cheap look lacking in details)
Here's an example of removing clothing seam lines: let's make the wrinkles more natural ( actually we are not removing all of them ) ... so that it's not too NSFW
After smudging, use img2img at low strength for smoothing to achieve a more natural effect.
More professional tools with advanced brush effects might achieve even more, such as adding richer details to images.
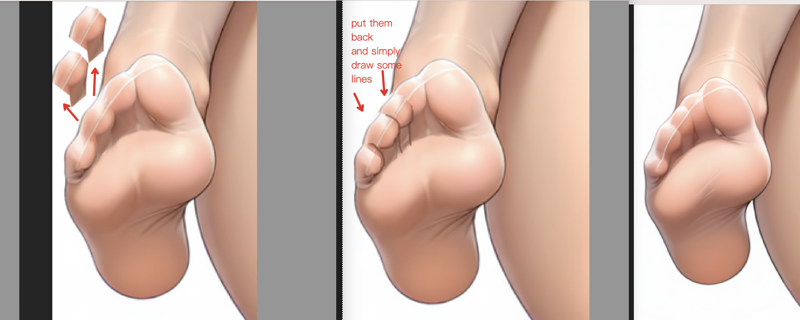
Technique: Logical Error Adjustments
For example, handling obvious problems like unnatural three-toed feet:
First quickly select the area using selection tools, then position and transform it (consider using liquify for pushing/pulling), and finally use medium-low strength redrawing in img2img to make the modified part blend harmoniously with the whole.
Technique: Selection Area Management & Segment Anything
When processing images, you may need multiple selection areas with precisely processed edges. If using WebUI, you'll find its selection editing functions relatively simple, not conducive to fine control, and limited to one selection at a time, requiring redrawing each time, which is very inconvenient.
Consider fine-editing selection areas in an image editor, using layers to save multiple pre-selected areas (for easy reuse anytime).
Additionally, various selection processing methods and inverse processing are very useful tools.
Also, using Segment Anything makes it easy to obtain "selection areas" very conveniently. For details, refer to: https://github.com/continue-revolution/sd-webui-segment-anything?tab=readme-ov-file
updated #250429
how to :
weight 0.5 ~ 0.7 tested, step > 30 (step must be a bit higher, or I can see in some generations that pussy is rendered improperly)
highres fix ( or high res img2img ) is recommended
adetailer might not be needed
lab 11-01 : training in Civit
hmmmm... I have no further comment as I haven't got a chance to test the result LoRA yet.
Pro. However, the whole workflow is seamless ( from dataset preparing, all the way to publish a trained LoRA )
Con. I didn't find a way to upload reg image set ?
Con. There is no way to see the Loss over steps ( e.g. tensor board )
Con. the training size is fix SQUARE, as said so, you can't specify something like 832 x 1216