ミーム ちょろいもんだぜ / そのキレイな顔をフッ飛ばしてやる!! meme choroimondaze / sono kireina kao wo huttobashiteyaru !!


Details
Download Files (2)
Model description
初めに言っとくけどフルセットで作ろうとすると割と面倒なので注意
生成結果結合式複数Lora
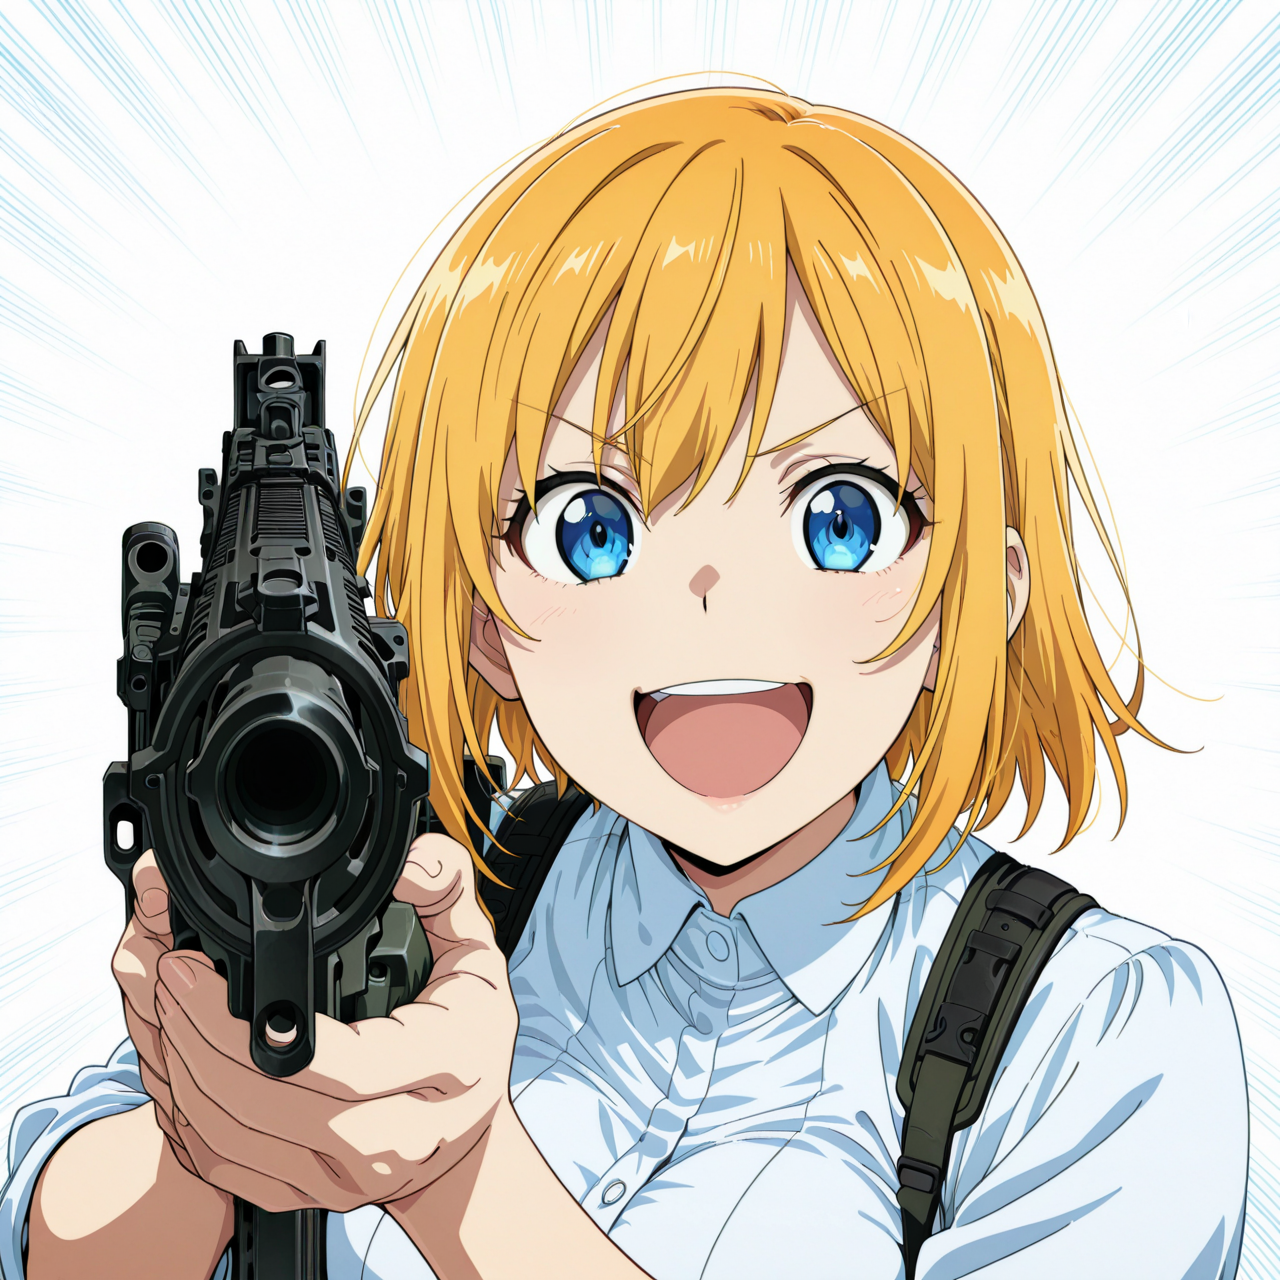
漫画「覇王愛人」より、世界一腕の立つ殺し屋が銃を構えて男性を狙うシーン
…が色々ツッコミ処があり、ネタとなった
・狙撃用にアサルトライフル(形状はm4カービンっぽい)を選択
・肩支え撃ち(そういう撃ち方もある事にはあるらしいが…)
・銃に照準器無しで何故か男性に照準が付いてる
という1ページシーンを簡易的に4コマ構成にした分割コンセプトLora
文字吹き出しは面倒なので別パーツとして作成した。
張り付けるか自作してメッセージ付け替えたりしてください
各コマのLoraをポージング毎に表現すれば
P01:キャラ01 横向きm4カービンの肩構えポーズ
P02:キャラ02 斜め向き顔中心
P03:キャラ02 後頭部
P04:キャラ01 正面銃肩支えポーズ
+吹き出しコマパーツ(便宜上、添付ファイルのトレーニングデータ枠で添付した)
コンセプトの説明はここまでとし、各Lora部分の説明に移る。
P01:ちょろいもんだぜLora
一番面倒くさいLora
モデルで出してもヒット率7%ぐらいか。外部Loraだと強度上げても全く安定しない。
Adetelar必須に近い。見本とかからのControl netも使った方がいい。
むしろCNだけの方が逆に安定するのでは。と思わないでもない…
銃の造形があまり安定しない。P04でもあるがたまに照準器付いたり、コンセプトが正面から破壊される事がある。
横長推奨
推奨強度 1.0
P02:正面斜め顔Lora
斜め顔周りを学習させているが 首回り、顔周り以外のタグワードは使わない事推奨
学習画像がキリッとした顔が多めだったため、そういう画風になりがち
地味に胸サイズ調整しづらい
推奨強度 0.8-1.0
P03:後頭部顔Lora
後頭部Lora。顔側や肩回りより下のタグワードは使わない事推奨
推奨強度 0.8-1.0
P04:そのキレイな顔をフッ飛ばしてやる!Lora
P01よりは幾分マシ。キャラ変もそこそこしやすい。
P01よりはマシだが銃部分の成形がそこそこ不安定
推奨強度 1.0
使い勝手としてはP01+P02、またはP03+P04の2コマ利用するのが比較的楽か
4コマ構成するのは地味に疲れる。
以上
[Important Note]
Just a heads-up — trying to build this as a full set is actually quite a hassle. Be warned.
Multi-Part LoRA Based on Combined Outputs
From the manga "Haou Airen", this LoRA is based on the infamous scene where the world’s top assassin aims a rifle at a man... but the setup is full of logical inconsistencies, which turned the scene into a meme.
Highlights of the scene include:
The assassin chooses an assault rifle (visually similar to an M4 carbine) for a sniper task
She shoulders the rifle, which is technically plausible, but unusual for sniping
Despite having no scope, somehow the man is perfectly in the crosshairs
This scene has been simplified into a 4-panel meme-style split concept, with each panel designed as a separate LoRA.
The speech bubbles are excluded — please add your own as overlays or stickers depending on the message you want to display.
Panel Concepts and Recommended LoRA Pairings
If you're generating images using LoRA per pose:
P01: Character 01 – Side-facing pose with shouldered M4-style carbine
P02: Character 02 – Frontal angle with face at a 3/4 view
P03: Character 02 – Rear head view
P04: Character 01 – Front-facing pose, holding rifle against shoulder
For convenience, speech bubble panel parts are bundled inside the training data zip file. You can paste or modify them freely to add your own messages.
Individual LoRA Descriptions
P01: “That’s easy” LoRA
→ The most troublesome one.
Even with the base model, hit rate is about 7%. External LoRA use is unstable even with high strength.
Practically requires ADetailer. It's highly recommended to use ControlNet (reference or sketch-based).
In fact, ControlNet-only may work better.
The gun design is unstable — same for P04. Sometimes the rifle includes a scope, ruining the intended joke.
Recommended strength: 1.0
P02: Angled Face LoRA (Frontal 3/4 View)
Focuses on learning angled facial expressions.
Avoid using tag words for body parts other than head/neck.
Trained on sharp, confident expressions, so results lean toward that style.
Recommended strength: 0.8–1.0
P03: Back of Head LoRA
Dedicated to rear head angles.
Avoid tag words for front face, shoulders, or body — focus strictly on head shape.
Recommended strength: 0.8–1.0
P04: “I’ll blow that pretty face off!!” LoRA
Somewhat more manageable than P01. Character switching is more flexible.
Still suffers from occasional gun instability — especially scope artifacts.
Recommended strength: 1.0
Tips for Use
Combining P01 + P02, or P03 + P04 as a 2-panel layout is relatively easy to handle.
Creating all 4 panels in sequence is quite exhausting — proceed with patience.