SDXL 4 Phase Super Refiner V1


详情
下载文件
模型描述
ComfyUI SDXL 4-Phase Super Refiner V1
Ultimate Multi-Phase SDXL Image Generation Workflow
Author: DarthRidonkulous
Version: 1.0
Release Date: November 26, 2025
Status: Ready to Use
🌟 Overview
The SDXL 4-Phase Super Refiner V1 is a creative powerhouse that lets you build images through four distinct transformation phases, each one giving you complete artistic control to shape, refine, and evolve your vision. Think of it as painting in layers—start with your concept, then progressively add detail, change direction, or completely transform the style as you go.
What Makes This Workflow Special
Four Creative Transformation Phases - Each phase can take your image in a completely different direction
Mix & Match Models - Use different checkpoints per phase for wild hybrid styles
Independent LoRA Control - Load up 12+ LoRAs and cherry-pick which effects fire at each phase
Style Evolution - Start photorealistic, end up anime. Or vice versa. Or something in between.
Experiment Freely - 12+ save points let you see every phase of transformation
Triple FaceDetailer - Perfect faces at multiple phases, or let them evolve naturally
Creative Chaos Mode - Randomize everything and generate hundreds of variations
📦 Installation Guide
System Requirements
Minimum Requirements:
ComfyUI (latest version recommended)
NVIDIA GPU with 12GB+ VRAM (16GB+ recommended for full features)
32GB+ system RAM (64GB recommended for large batches)
Python 3.10+ (usually included with ComfyUI)
SSD storage for faster workflow loading
Recommended Requirements:
NVIDIA RTX 4090 or equivalent
64GB+ system RAM
NVMe SSD storage
ComfyUI Manager installed
Required Custom Node Packs
This workflow requires the following custom node packs (install via ComfyUI Manager):
ComfyUI-Impact-Pack - FaceDetailer and detection nodes
ComfyUI-LoRA-Manager - Visual LoRA selection interface
ComfyUI-Easy-Use - Memory management utilities
rgthree's ComfyUI Nodes - Power Prompt functionality
pysssss Custom Scripts - ShowText and ReroutePrimitive nodes
WAS Node Suite - Various utility nodes
kjNodes - Image processing utilities
Custom Nodes Installation
This workflow includes custom controller nodes that must be installed:
Step 1: Locate Custom Nodes Folder
Windows:
ComfyUI_windows_portable\ComfyUI\custom_nodes\Linux/Mac:
ComfyUI/custom_nodes/
Step 2: Install Required Custom Nodes
Copy these files to your custom_nodes folder (available in the project files):
sdxl_image_settings_controller_4phase.py- Centralized 4-phase settings managementmulti_phase_prompt_manager_4phase_v2.py- Advanced 4-phase prompt control with positive/negative promptsvae_selector.py- VAE selection and management
Step 3: Restart ComfyUI
Close ComfyUI completely
Restart the application
Wait for full startup
Step 4: Verify Installation
Right-click on canvas to open node menu
Search for "SDXL Image Settings Controller (4 Phase)"
Search for "Multi-Phase Prompt Manager (4 Phase) V2"
Search for "VAE Selector"
If all three appear, installation successful!
Step 5: Load the Workflow
Download
SDXL_4_Phase_Super_Refiner_V1.jsonOpen ComfyUI interface
Click "Load" or drag JSON file onto canvas
Workflow should load with all nodes visible
Check for any missing node warnings
What These Custom Nodes Do
SDXL Image Settings Controller (4 Phase)
This is your central control hub for the entire 4-phase workflow. Instead of having settings scattered across multiple nodes, everything is in one place:
Resolution Control: 60+ resolution presets including:
Square [1:1]: 512² to 1792²
Portrait [2:3, 3:4, 9:16]: Multiple aspect ratios
Landscape [3:2, 4:3, 16:9]: Multiple aspect ratios
Ultra-Wide [21:9, 32:9]: For cinematic content
Cinematic [2.39:1]: Anamorphic widescreen
Seed Management: Four modes (fixed, randomize, increment, decrement)
Batch Size: Generate 1-4096 images at once
Subdirectory Organization: Keep your outputs organized by project
Per-Phase KSampler Settings: Configure all 5 settings (steps, CFG, sampler, scheduler, denoise) for ALL FOUR phases
Automatic Latent Generation: Creates the empty latent at your chosen resolution with correct batch size
Metadata Output: Complete summary of all settings for debugging
Outputs (27 total):
LATENT (empty latent image)
seed, subdirectory, width, height, batch_size
All Phase 1 KSampler settings (5 outputs)
All Phase 2 KSampler settings (5 outputs)
All Phase 3 KSampler settings (5 outputs)
All Phase 4 KSampler settings (5 outputs)
metadata (text summary)
This node replaces what would normally be 5+ separate nodes and makes it easy to adjust everything from a single location.
Multi-Phase Prompt Manager (4 Phase) V2
This handles BOTH positive and negative prompts across all four phases with independent control:
Phase 1: Base positive and negative prompts that other phases can reference
Per-Phase Trigger Selection: Each phase (1-4) has its own "selected_triggers" input for LoRA trigger words
Five Modes Per Phase (both positive and negative):
"Use Base (Phase 1)" - Use Phase 1 prompt
"Use Previous Phase" - Use the previous phase's prompt
"Unique Prompt" - Completely different prompt
"Append to Base" - Add to Phase 1 prompt (default)
"Append to Previous Phase" - Add to previous phase
Independent Positive AND Negative: Each phase controls both positive and negative prompts separately
Segs_Labels Support: Optional delimiter for each phase (wildcard integration)
Metadata Output: Debug summary showing which modes each phase is using
The key feature: Each phase gets its OWN trigger words from LoRA Manager. Phase 1 triggers don't affect Phase 2, Phase 2 doesn't affect Phase 3, etc. This is true per-phase LoRA control with no cross-contamination.
VAE Selector
This node lets you choose between using the VAE baked into your checkpoint or loading an external VAE file:
Toggle Switch: Simple on/off to choose between baked or external VAE
Baked VAE Mode (default): Uses the VAE that came with your checkpoint (passthrough)
External VAE Mode: Loads a separate VAE file from your VAE folder
Quick Testing: Easily compare baked vs external VAE quality without rewiring
This is useful when you want to test if an external VAE (like sdxl_vae.safetensors) produces better results than the VAE baked into your checkpoint, or when certain checkpoints need specific VAEs to work properly.
⚡ Centralized Control and Review Location
The workflow is organized with centralized frames for easy access and monitoring:
"Step 1- Phases, Models and Settings" Frame (Control Center):
SDXL Image Settings Controller (4 Phase) - All resolution, seed, batch, and KSampler settings for all 4 phases
Phase 1/2/3/4 Model Loaders - Checkpoint selection for each phase
Multi-Phase Prompt Manager (4 Phase) V2 - All prompts and trigger words for all 4 phases
VAE Selector - VAE selection
"Results and Settings" Frames (Review Areas):
There are two "Results and Settings" frames in the workflow - one for Phases 1-2 and one for Phases 3-4:
Preview Images - Large image preview nodes showing final image output from each phase
Phase 1 FaceDetailer preview
Phase 2 FaceDetailer preview
Phase 3 FaceDetailer preview
Phase 4 FaceDetailer preview
ShowText Nodes - Display complete settings for verification:
SDXL Image Settings Controller metadata (resolution, seed, all KSampler settings)
Multi-Phase Prompt Manager configuration (shows which modes each phase is using)
Positive and negative prompts for each phase
LoRA trigger words being applied
Quick Visual Comparison - See all phase outputs side-by-side without scrolling
What This Means:
You don't need to scroll through the massive workflow to check settings or see results. Everything is organized:
Make changes in the "Step 1" control frame
Verify settings in the ShowText nodes in "Results and Settings"
Review outputs in the large preview images
Compare phases side-by-side to see the evolution
This centralized approach means you can adjust settings, verify configuration, and review results all from one area without hunting through 700+ settings.
🎛️ Bypass Control - Use Only What You Need
You don't have to run all 4 phases every time. The workflow is designed so you can bypass entire phases and optional features:
Bypass Phases:
Use the Fast Bypass Node to bypass each phase and the model loader for that phase. You can also bypass save nodes for images that you don’t want to save or see.
Run Phase 1 only for quick prompt testing
Run Phases 1-2 only for faster iterations
Enable all 4 phases for final renders
Bypass FaceDetailers and Upscalers:
- Phase 1 through 4 Face Detailers can be bypassed. Enable only the ones you need, or none at all
Bypass Save Nodes:
12+ save points throughout the workflow
Disable intermediate saves you don't need
Keep only Phase 4 final output if you want
Or keep all saves to see complete evolution
Bypass Upscaling:
Upscaling is optional
Disable if you don't need 4x resolution in any Phase
Saves significant processing time
Why This Matters:
Speed: Bypass phases for faster testing
VRAM: Disable features if you're running low on memory
Disk Space: Turn off save nodes you don't need
Workflow Flexibility: Use as much or as little as you want
The workflow runs whatever you leave enabled. Everything else is skipped.
🚀 Quick Start Guide
Basic Workflow Setup
Step 1: Choose Which Phases to Run
Locate the Fast Bypass node (rgthree Fast Groups Bypasser):
Controls: Phase 2, Phase 3, Phase 4, FaceDetailers, and Save nodes
Enable phases you want to use (checkboxes ON)
Disable phases you want to skip (checkboxes OFF)
Common configurations:
Quick test: Phase 1 only (disable everything else)
Fast iteration: Phase 1 + 2 only
Full quality: All phases enabled
Step 2: Configure Base Settings
Navigate to the SDXL Image Settings Controller node:
Set
subdirectoryfor organized output (e.g., "4phase_test")Choose
resolution_preset(recommended: 1024×1024 for testing)Set
seedif desired.Set
seed_controlto desired settingSet
batch_sizeto 1 for initial tests
Step 3: Load Your Models
Configure model loaders for each phase:
Phase 1 Model Loader: Select your SDXL-based checkpoint (SDXL, Pony, Illustrious, NoobAI, etc.)
Phase 2 Model Loader: Same or different SDXL-based model
Phase 3 Model Loader: Same or different SDXL-based model
Phase 4 Model Loader: Same or different SDXL-based model
Pro Tip: Using the same model across all phases yields maximum consistency. Using different models creates hybrid artistic effects.
Step 4: Configure Phase Settings
In the SDXL Image Settings Controller, the workflow has default settings that work for most models, but you may need to adjust them for specific checkpoints.
Denoise Settings (Most Important - Controls How Much Each Phase Transforms):
Phase 1: Recommended setting is 1.0 (full generation from noise)
Understanding Denoise Ranges:
0.20-0.35: Minimal change, maximum detail preservation - subtle refinement of existing image
0.35-0.55: Moderate refinement - noticeable improvements while maintaining composition
0.55-0.70: Significant transformation - major changes while keeping general style
0.70-1.0: Nearly complete to complete change - rebuilds the image but maintains style characteristics
For Complete Style Changes Between Models: When switching models to completely change the style (anime to realistic, or vice versa), you need denoise values of 0.45 to 0.60. Lower values may not give the model enough freedom to transform the style. Higher values might lose too much of the original composition.
You can set any phase to any denoise value depending on what you want to achieve. Higher denoise = more transformation. Lower denoise = more preservation of the previous phase.
Other Settings (Model-Dependent):
The workflow defaults should work for most models:
Steps, CFG, Sampler, Scheduler vary by checkpoint
Test with workflow defaults first
Adjust if results aren't as expected
Some models prefer specific samplers (check model card)
Step 5: Configure Prompts
Locate the Multi-Phase Prompt Manager (4 Phase) V2 node:
Phase 1:
Enter your base prompt in
phase_1_positive_promptEnter negative prompt in
phase_1_negative_prompt
Phase 2/3/4:
Each phase has a mode dropdown (default: "Append to Base")
Set mode: Use Base, Use Previous, Unique Prompt, Append to Base, or Append to Previous
Enter custom text in the positive/negative custom fields if using Unique or Append modes
Step 6: Configure LoRAs (Optional)
Load LoRAs:
Use LoRA Manager to visually select LoRAs for each phase
Each phase has its own Lora Loader node
LoRAs can be different per phase or the same across all phases
Select Trigger Words:
Each phase has TriggerWord Toggle nodes
Enable/disable specific trigger words for that phase
Triggers connect automatically to the Multi-Phase Prompt Manager
Carryover Trigger Words:
Phase 2, 3, and 4 have "Carryover TriggerWord Toggle" nodes
These let you select trigger words from PREVIOUS phases to carry forward
Example: Enable a Phase 1 trigger in Phase 2's carryover node to keep that effect
This gives you control over which LoRA effects persist across phases
Step 7: Run Your First Generation
Click "Queue Prompt" in ComfyUI
Monitor console for any errors
Check ShowText nodes for configuration verification
Find outputs in your configured subdirectory
Important: Embedded Workflow Information
ComfyUI automatically embeds the complete workflow, settings, prompts, models, seed, and LoRAs into every generated image's metadata.
Why Run Once Before Changing Settings:
Generate one image with the default workflow settings first
This image contains the original workflow configuration
If you make changes and want to return to defaults, simply drag this image back into the ComfyUI GUI
The workflow will reload with all original settings: prompts, models, seed, LoRAs, and all node configurations
This is your "reset to defaults" backup
Benefits:
Never lose working configurations
Easy to compare different settings
Share complete workflows by sharing images
Document exactly what created each image
Loading Workflow from Generated Images
Once you've generated images with this workflow:
Find any image generated by this workflow in your output folder
Drag the image directly onto the ComfyUI canvas
The complete workflow loads with all settings from that generation
All prompts, models, seed, LoRAs, and node settings are restored exactly as they were
This is the easiest way to reload the workflow or share configurations with others.
🎯 Creative Possibilities
Multi-Phase Transformation
Phase 1: Your Starting Point
Generate your base concept at any resolution
Set the foundation for what comes next
Use any SDXL checkpoint you want
Add LoRAs to establish your style
Save point: Your original vision
Phase 2: First Evolution
Keep refining the same concept, OR...
Take it in a completely different direction
Switch models for style hybridization
Add different LoRAs for new effects
Choose your denoise: 0.3 for tweaks, 0.6 for transformation
Save point: See how it evolved
Phase 3: Deep Dive
Continue the journey or pivot again
Optional FaceDetailer if you want perfect faces
Mix in more LoRAs—you've got independent control
This is where details really start to pop
Save points: Before and after face enhancement
Phase 4: The Final Form
Polish everything to perfection, or...
Make one last dramatic transformation
Second FaceDetailer pass for ultimate facial control
4x upscaling option for massive detail
Optional third FaceDetailer on the upscaled version
Save points: Base, FaceDetailer, Upscaled, Upscale+FaceDetailer
Creative Control Systems
Play With Everything:
Each phase gets its own prompt—inherit from Phase 1 or go rogue
12+ LoRAs across all phases? Go for it. No cross-contamination.
Mix photorealistic and anime models for hybrid styles
Randomize seeds and generate hundreds of variations
Save every phase to see the complete evolution
Resolution Freedom:
30+ presets from 512×512 to 2688×1792
Square, portrait, landscape, ultra-wide
Start small for speed, go huge for detail
Seed Modes for Different Vibes:
Fixed: Perfect the same concept across phases
Randomize: Chaos mode—every generation is unique
Increment/Decrement: Subtle variations on a theme
Batch Generation:
Generate 1-50+ images at once
Randomize everything for variety
Use wildcards for prompt variations
See what emerges from creative chaos
💡 Creative Modes
Strategic LoRA Usage Across Phases
You can apply different LoRAs and trigger words in each phase for precise control over the generation process:
Phase-Specific LoRA Strategy:
Phase 1: Shape/structure LoRAs - body types, armor, clothing, pose
Phase 2: Detail enhancement LoRAs - Wonderful Details, texture enhancers, shapers (Hands, items, etc.).
Phase 3: Lighting and atmosphere LoRAs - dramatic lighting, effects, ambiance, liquid, smoke light shapers, and enhancers.
Phase 4: Refiner LoRAs - final polish, quality boosters, detailers, and refiners.
Why This Works:
Build the foundation first (structure and form)
Add complexity progressively (details and textures)
Apply finishing touches last (lighting and refinement)
Each phase focuses on one aspect without overwhelming earlier stages
Using Carryover Triggers:
Use carryover nodes to keep essential triggers from previous phases
Drop triggers that served their purpose: Example: Keep body type trigger through all phases, but drop clothing detail trigger after Phase 2
Enable LoRAs used before with weights to add heavy weight to those LoRAs.
Strategic Prompt Adjustments Across Phases:
Your Phase 1 prompt establishes the complete scene - subject, background, atmosphere, everything. Later phases refine and emphasize what's already there.
What You CAN Do in Later Phases:
Adjust weights on specific elements:
Emphasize colors: "(red umbrella:1.4)" to intensify existing red
Boost specific details: "(intricate armor:1.3)", "(glowing moon:1.5)"
De-emphasize elements: "(forest background:0.8)" to push it back
Append to base prompt:
Add emphasis terms: "dramatic lighting", "highly detailed armor"
Quality adjustments: "8k", "masterpiece", "professional photography"
Atmosphere enhancements: "volumetric fog", "rim lighting"
Slightly modify the prompt:
Shift focus while keeping the scene: adjust what gets attention
Change quality descriptors for different models
Adjust atmosphere while keeping composition
Change models to shift style while maintaining composition
Apply different LoRAs to enhance specific aspects (details, lighting, quality)
Use different embeddings per model or for quality adjustments
The Key Rule: Stay true to what Phase 1 established. You're refining, emphasizing, and enhancing the existing scene - not adding new elements that weren't there from the start.
Example:
Phase 1: "dark elf warrior, red umbrella, ornate black kimono, blonde braid, forest background, night, glowing moon, falling petals"
Phase 2: Same base + "(intricate kimono patterns:1.3)" - emphasizes existing detail
Phase 3: Same base + "(dramatic red lighting:1.4), volumetric atmosphere" - enhances existing lighting
Phase 4: Same base + "Amateur Photography, harsh lighting, High contrast lighting, 80s Poloroid Photo”, quality change or enhancement.
Maximum Detail Mode
When to use:
You've got a prompt you absolutely love
You want to extract every possible detail
Portfolio-worthy final renders
That one perfect character/scene
How to set it up:
Enable all four phases
Use the same model throughout (consistency)
Progressive denoise: 1.0 → 0.35 → 0.35→ 0.25
Enable all FaceDetailer passes, you can change detail different parts in each phase as well. Defaults are face and skin or face and person in Phase 4
Enable upscaling for 4K
What you get: 12 saved images showing the complete evolution from rough concept to masterpiece
Style Transformation Mode (This is where it gets FUN)
When to use:
You want to see your concept in different styles
Experimenting with model hybrids
Creating something totally unique
"What if this photorealistic portrait was anime?"
How to set it up:
Phase 1: Start with any model
Phase 2: Switch to a completely different model
Phase 3: Try another model or stick with Phase 2
Phase 4: Go wild
Use "Unique Prompt" mode for each phase
Higher denoise values (0.40-0.60) for bigger transformations
Different LoRA sets per phase
Example journeys:
Phase 1: Photorealistic → Phase 2: Pony Diffusion → Phase 3-4: Full anime
Phase 1: Anime base → Phase 2-4: Progressive photorealism
Phase 1: SDXL base → Phase 2: Illustrious → Phase 3: NoobAI → Phase 4: Back to SDXL
Anime to Realistic Transformation Strategy:
This is a powerful technique for creating unique hybrid styles:
Phase 1 (Anime Model - Illustrious, NoobAI, Pony):
Denoise: 1.0
LoRAs: Body type, armor, clothing, pose (structure)
Build the composition and character in anime style
Phase 2 (Switch to Semi-Realistic or Realistic Model):
Denoise: 0.55 (significant transformation while keeping composition)
Model: SDXL realistic checkpoint or semi-realistic blend
LoRAs: Detail enhancers (Wonderful Details, texture enhancers)
This is where the style shift happens
Phase 3 (Continue with Realistic Model):
Denoise: 0.35-0.45
LoRAs: Lighting and atmosphere LoRAs
Refine the realistic elements, add depth
Phase 4 (Final Realistic Polish):
Denoise: 0.25-0.35
LoRAs: Refiner LoRAs, quality boosters
Final photorealistic details
Why This Works:
Anime models excel at composition, character design, and creative poses
Realistic models excel at texture, lighting, and physical accuracy
The 0.55 denoise in Phase 2 maintains the composition while transforming the style
Progressive LoRA strategy builds complexity without overwhelming the transformation
Result: Compositions that feel anime-inspired but look photorealistic
What you get: Mind-bending style evolution that you can't achieve any other way
Progressive Enhancement Mode
When to use:
You like your Phase 1 but want MORE
Refining details without changing the core concept
Testing how far refinement can go
Learning what denoise values do
How to set it up:
Enable Phases 1 and 2, bypass 3 and 4 at first
Use "Use Base (Phase 1)" mode for consistency
Try different Phase 2 denoise values to see effects
Same model both phases
Optional: Enable Phase 3 to see deeper refinement
What you get: Perfect for learning how the workflow behaves and finding your sweet spot
Chaos Generation Mode
When to use:
You want to discover happy accidents
Building a dataset of diverse images
Looking for inspiration
"Let's see what happens"
How to set it up:
Seed: "randomize"
Use wildcards in prompts for variety
Maybe randomize denoise slightly per phase
Mix and match different models/LoRAs
Enable everything
What you get: Hundreds of unique images, many you never would have thought to create manually. This is where you find your best work.
LoRA Experimentation Mode
When to use:
You've got a pile of new LoRAs to test
Want to see how LoRAs interact
Building your "LoRA toolkit" understanding
Creating signature multi-LoRA combinations
How to set it up:
Phase 1: Test 3-4 foundational LoRAs
Phase 2: Add different LoRAs to see how they mix
Phase 3: Try yet another combination
Phase 4: Your favorite combo from earlier phases
Use ShowText nodes to verify which triggers are active
Take notes on what works together
What you get: Deep understanding of how to orchestrate multiple LoRAs for unique styles
The "Perfect One Image" Mode
When to use:
Commission work or gift art
That character reference you need to nail
Your OC that has to be exactly right
Profile picture / avatar that represents you
How to set it up:
Use a fixed seed you've tested
All phases enabled with carefully chosen models
Hand-select LoRAs that nail the aesthetic
Multiple FaceDetailer passes
Full upscale to 4K
Take your time adjusting prompts between test runs
What you get: The single most refined image possible from this workflow
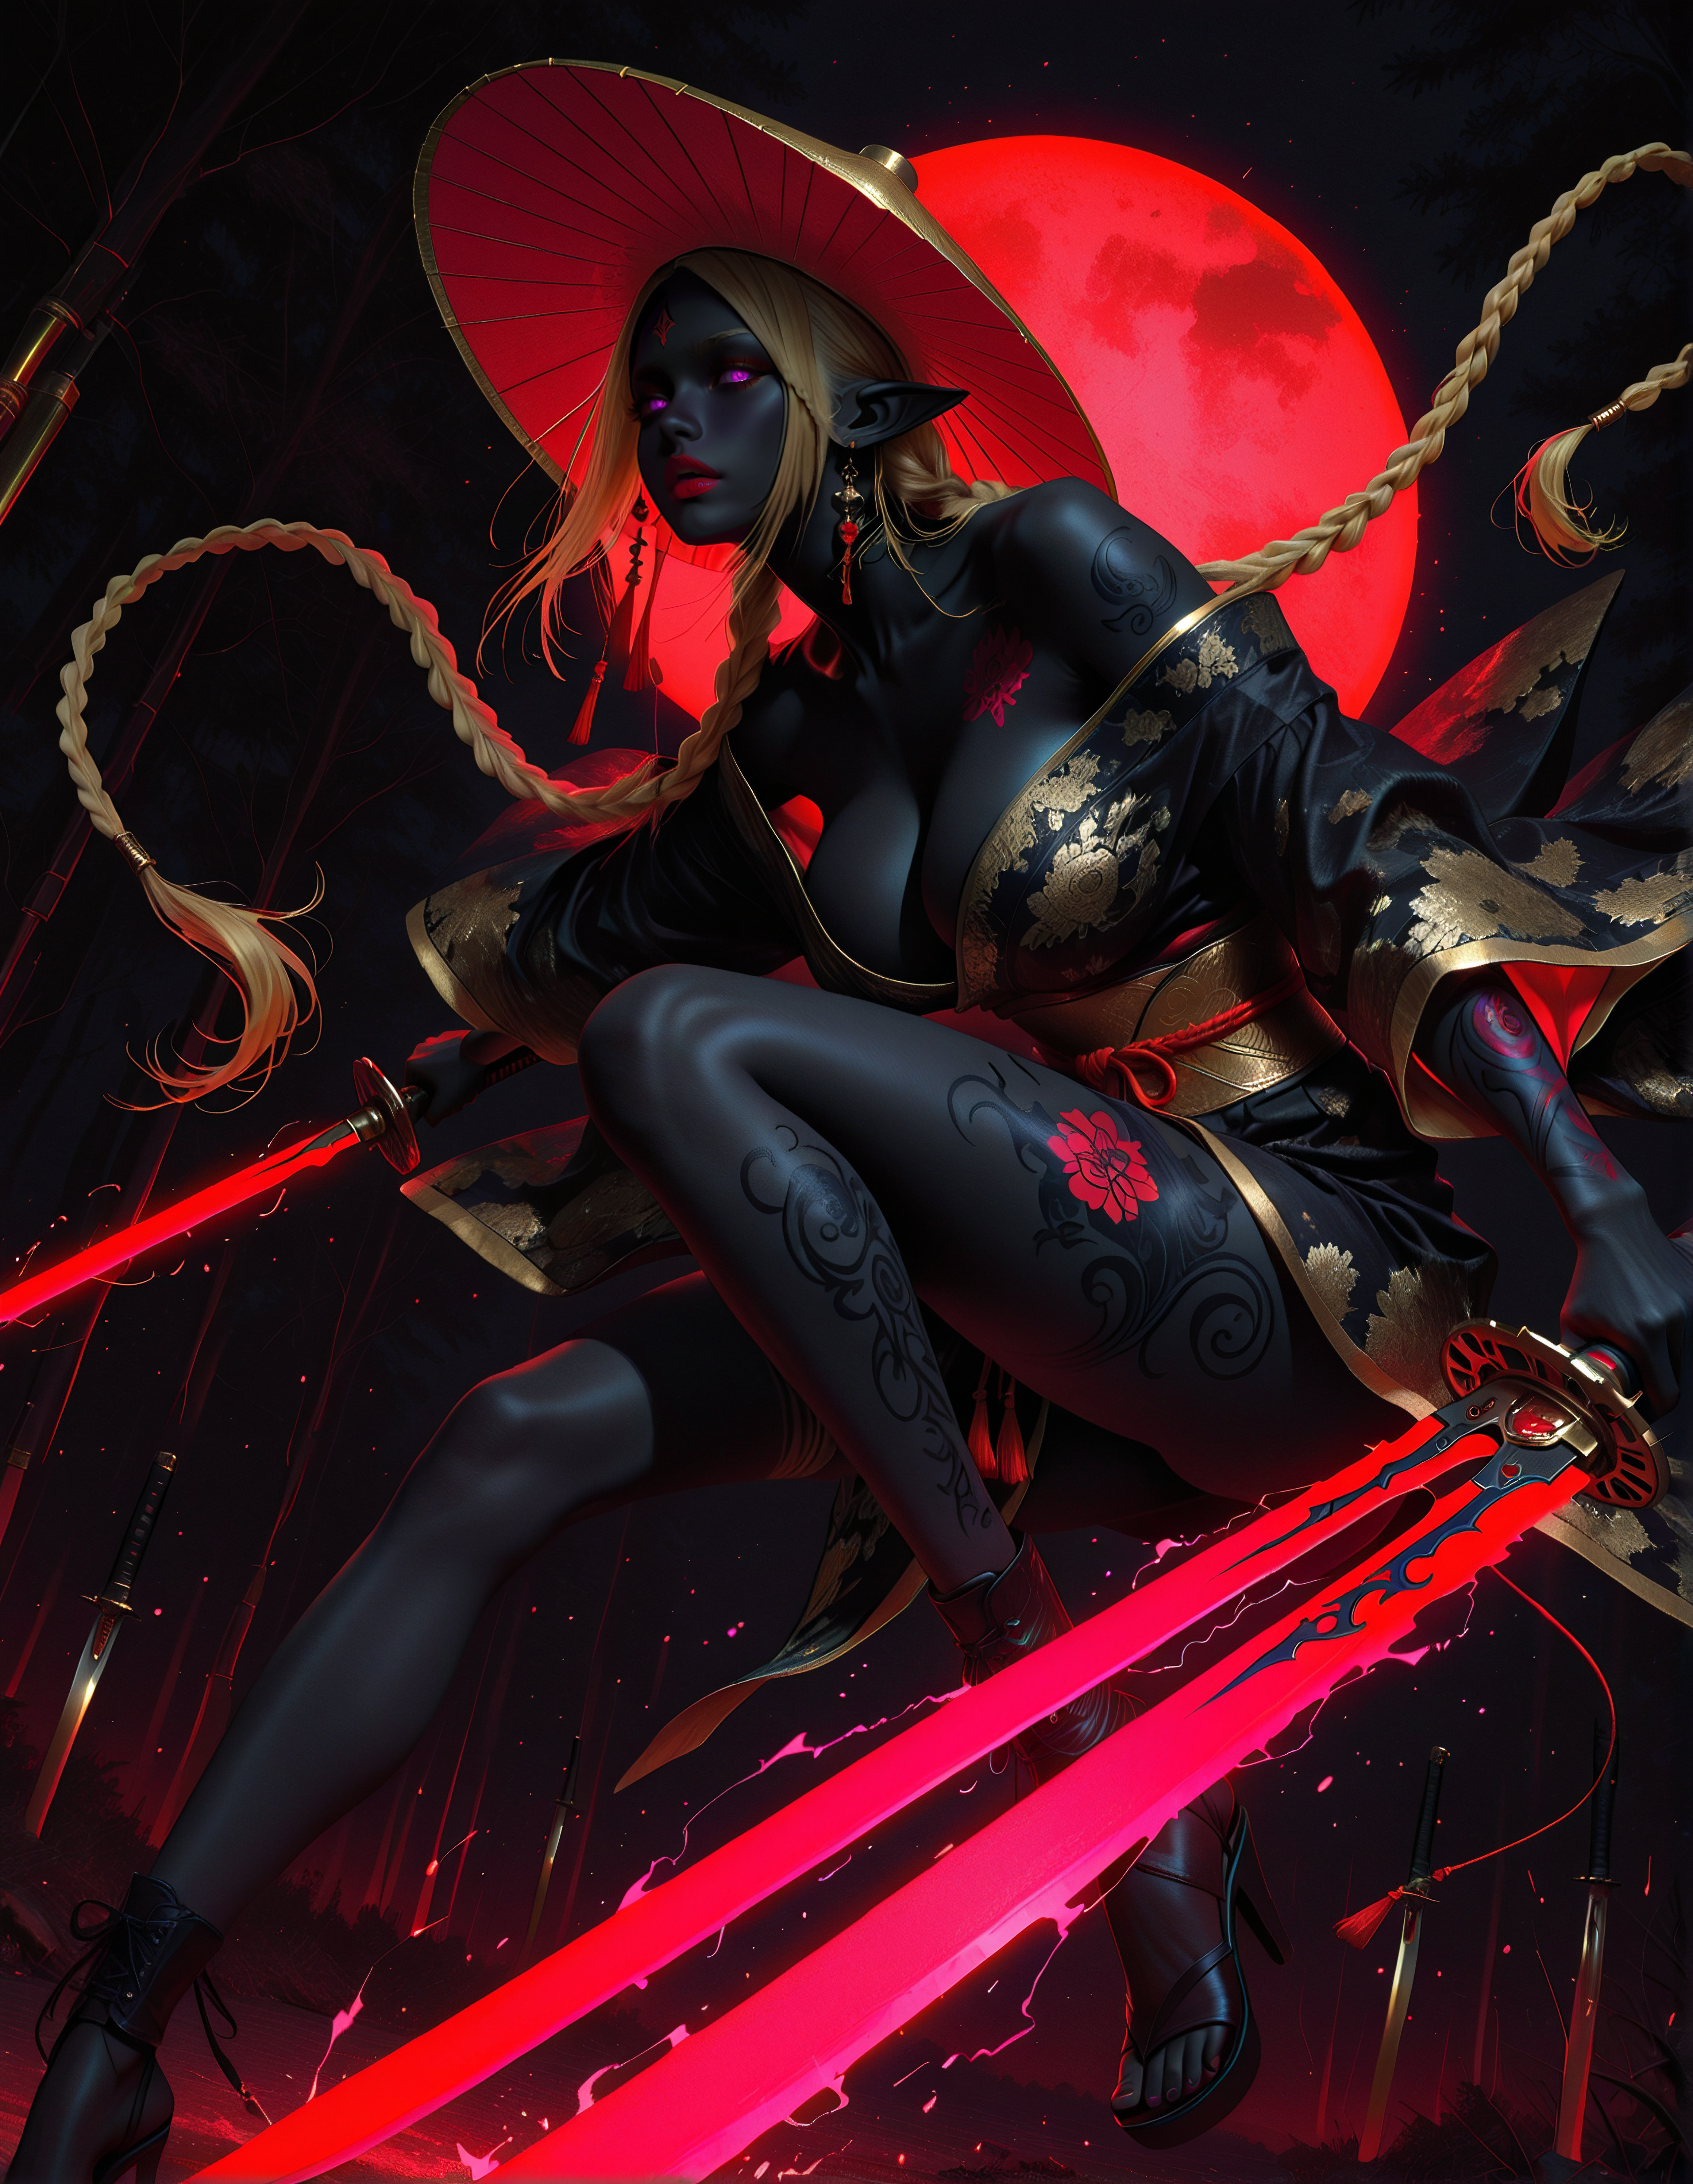
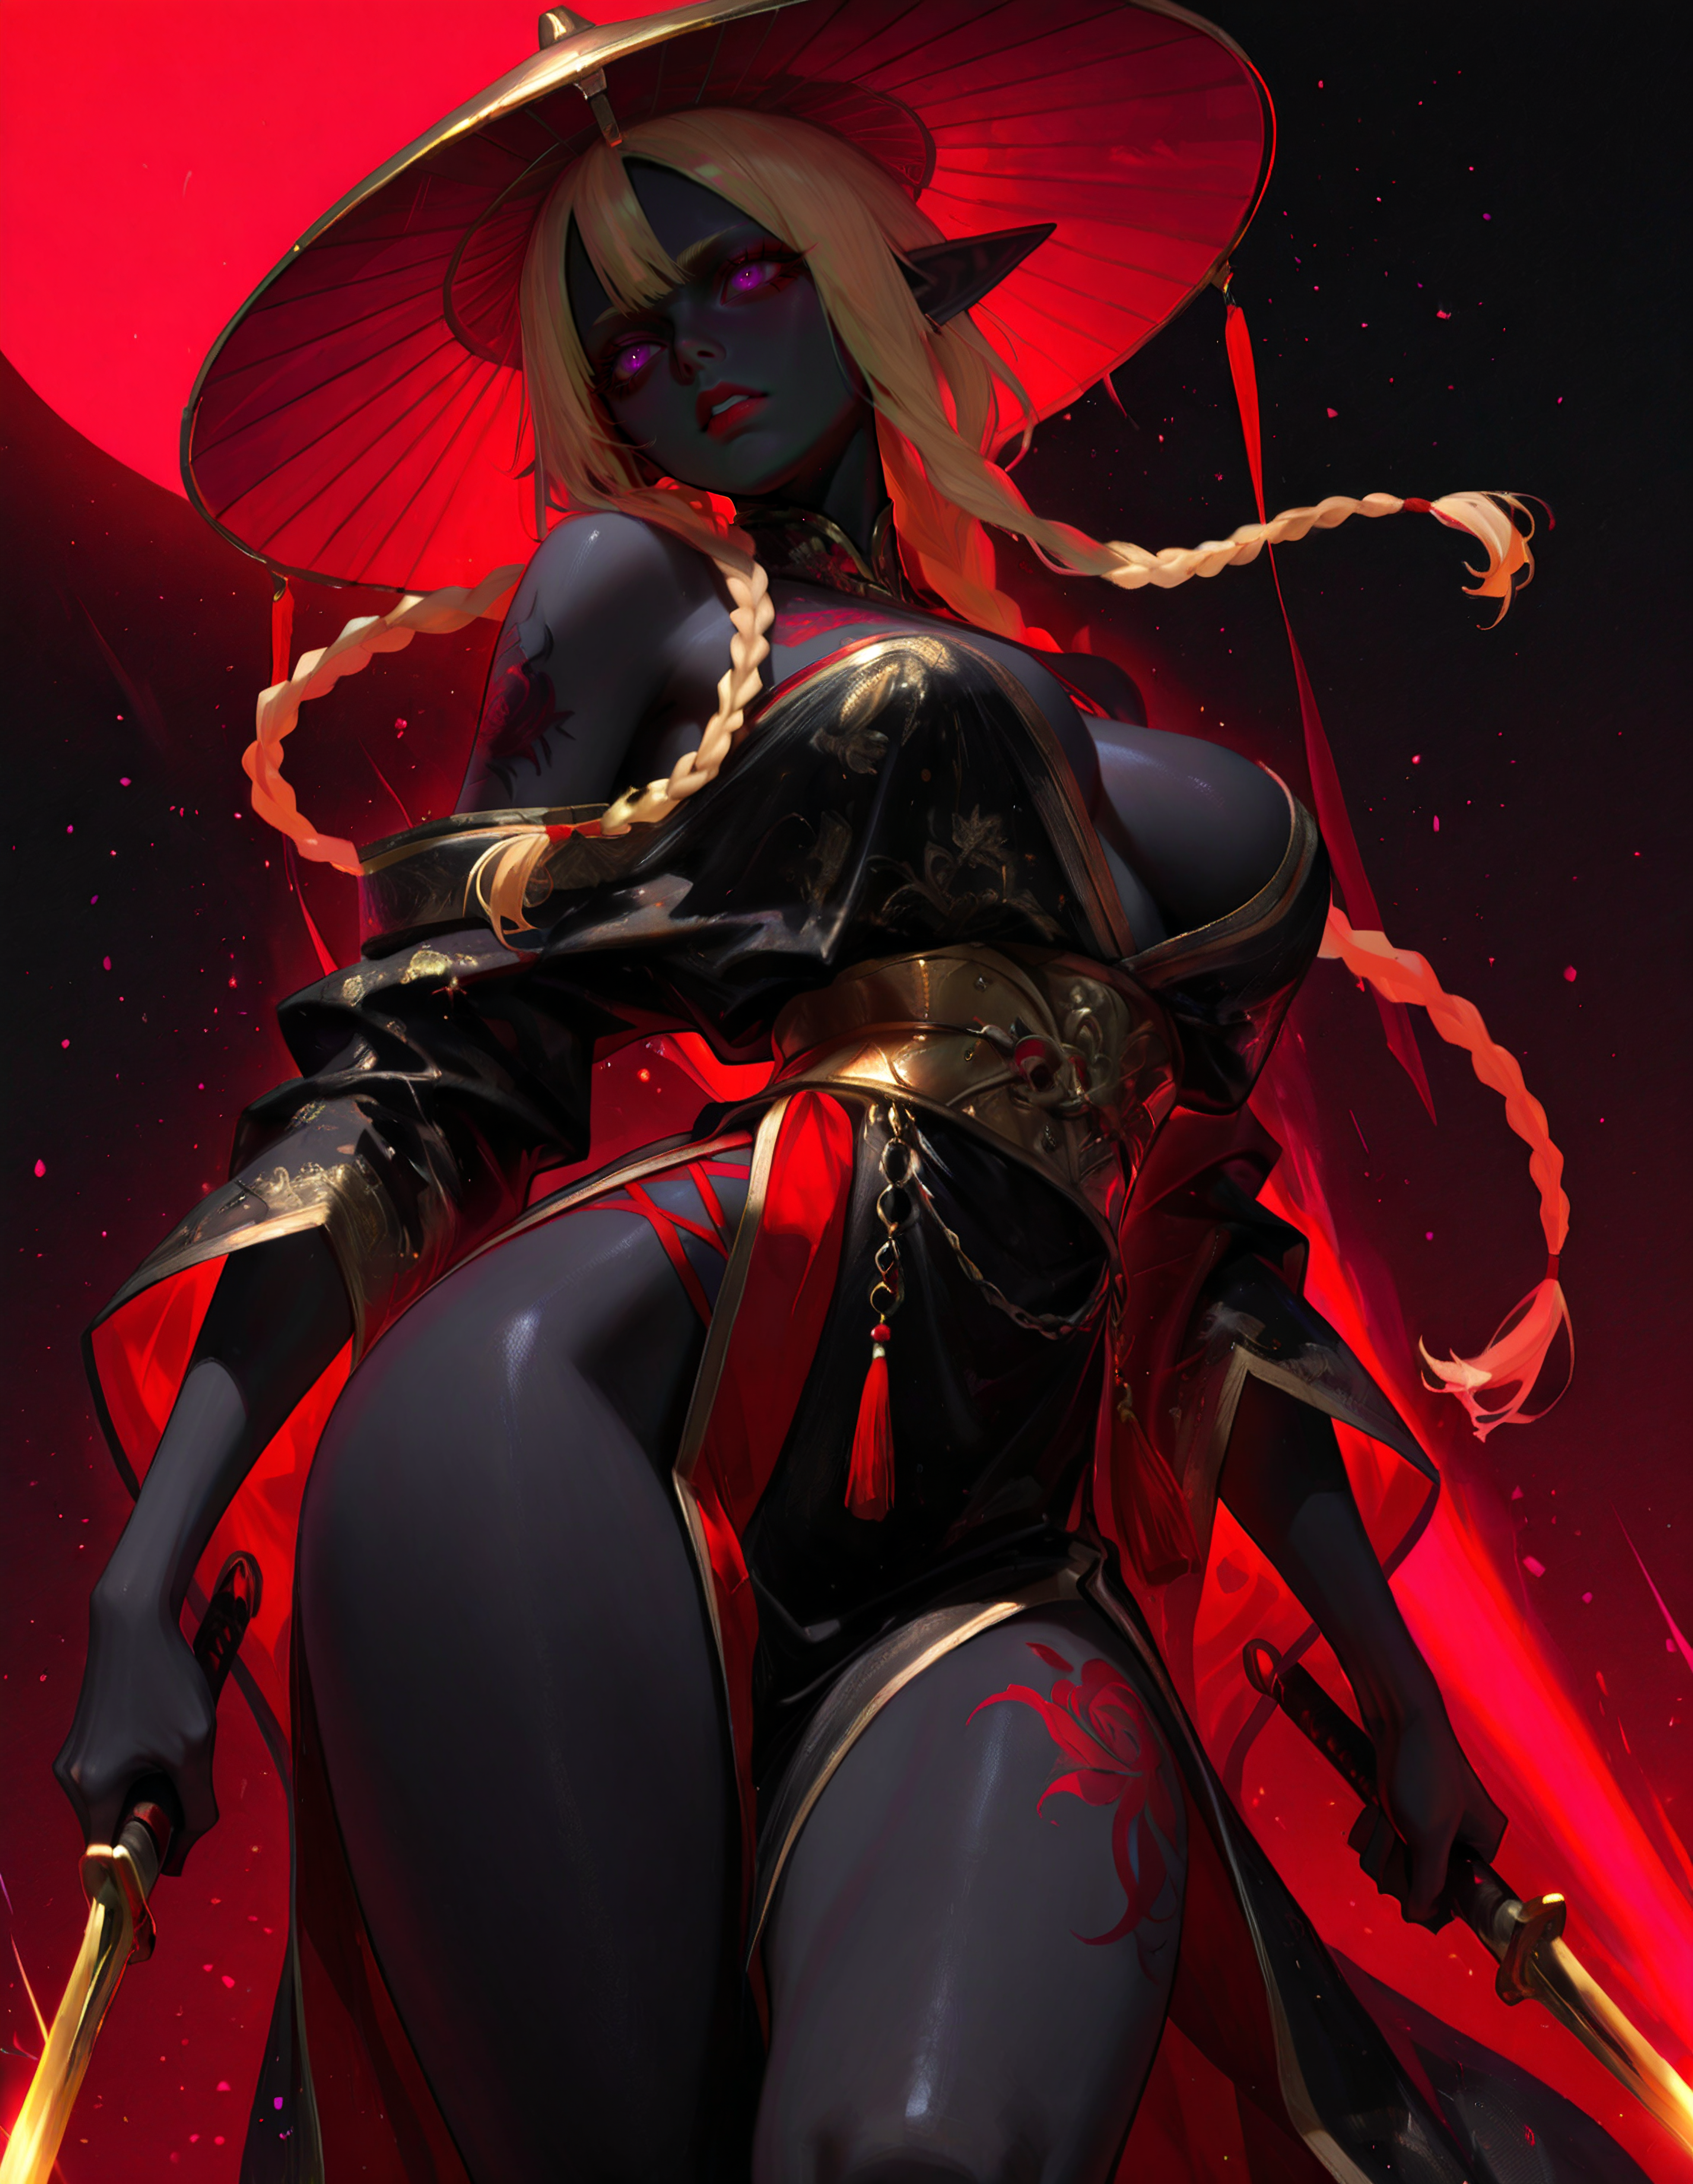
🖼️ Real Example: 4-Phase Multi-Model Transformation
Here's an actual generation showing what this workflow can do when you mix different models across phases (see example posts):
The Setup:
Started with a dark elf warrior concept
Used 3 different models across the 4 phases
Progressive denoise pattern for controlled evolution
Each phase refined details while maintaining core composition
What Happened Across Phases:
Phase 1 (Base Generation): Established the foundation—character pose, composition, dramatic red lighting, the umbrella, the flowing fabric. This is where the core concept lives.
Phase 2 (First Model Switch): Notice how the facial details started to sharpen, the fabric textures became more defined, and the ornate patterns on the clothing gained clarity. The red light effects intensified while maintaining the original pose perfectly.
Phase 3 (Continued Refinement): The intricate embroidery on the kimono got more detailed, the skin texture refined, individual strands of the braid became visible, and the background elements (falling petals, atmospheric particles) gained definition. The golden accents and ornamental details really popped.
Phase 4 (Final Polish): Ultimate refinement—every detail crisp, the contrast between the dark skin and golden ornaments perfected, the red glow effects optimized, fabric folds and patterns at maximum detail. This is the keeper.
The Magic: Same seed, same basic prompt structure, but THREE different models shaped this image across four phases. The result? A style hybrid that doesn't exist in any single checkpoint. The photorealistic rendering combined with painterly lighting and anime-inspired composition elements—this only happens with multi-phase model mixing.
Key Takeaway: Notice how each phase REFINED rather than REPLACED. The composition from Phase 1 stayed rock-solid through all four phases. That's the beauty of controlled denoise values—you get evolution, not revolution.
This is one image. Imagine doing this with batch_size 20 and randomized seeds. That's when things get really interesting.
🐛 Troubleshooting
Workflow Won't Load
Symptom: Error messages when loading workflow JSON
Solutions:
Verify all custom node packs are installed
Install the two required custom Python files
Restart ComfyUI completely
Check console for missing node errors
Update ComfyUI to latest version
Reinstall missing node packs via Manager
Custom Nodes Not Found
Symptom: "SDXL Image Settings Controller" or "Multi-Phase Prompt Manager" nodes missing
Solutions:
Verify files are in
custom_nodes/folder (not in subfolder)Check file names match exactly:
sdxl_image_settings_controller.pymulti_phase_prompt_manager.py
Open files in text editor, verify no syntax errors
Restart ComfyUI after copying files
Check Python console for import errors
Out of VRAM
Symptom: Generation crashes mid-process, CUDA out of memory errors
Solutions:
Reduce
batch_sizeto 1Bypass Phase 3 and Phase 4 temporarily
Disable all FaceDetailer passes
Disable upscaling
Use lower resolution preset
Verify model unload nodes aren't bypassed
Close other GPU-intensive applications
Update to latest GPU drivers
Images Not Saving
Symptom: Workflow runs but no output images appear
Solutions:
Check
subdirectorypath in controllerVerify SaveImage nodes aren't bypassed
Check ComfyUI output folder permissions
Review console for file write errors
Ensure drive has sufficient space
Try removing subdirectory (use default output)
Phase 2/3/4 Look Wrong
Symptom: Later phases don't match expectations
Solutions:
Check prompt mode in Multi-Phase Prompt Manager
CFG Settings are too high for the selected model.
Verify denoise values (too high = too much change)
Review ShowText nodes for actual prompts used
Confirm correct model loaded for each phase
Check LoRA weight values and triggers are selected correctly
Verify VAE consistency across phases
Try "Use Base (Phase 1)" mode for consistency
LoRA Effects Not Working
Symptom: LoRA triggers not producing expected results
Solutions:
Verify trigger words match LoRA requirements
Check trigger selection in prompt manager
Confirm LoRA Manager has LoRAs loaded
Review ShowText outputs showing triggers
Test LoRAs individually in simple workflow
Verify LoRA weight values (typically 0.6-1.0)
Check for trigger typos
Workflow Runs Slowly
Symptom: Generation takes much longer than expected
Solutions:
To go through all 4 Phases expect 2 minutes or more.
Face detailers will detect and detail EVERY face in the image and that will slow generation down tremendously.
Disable optional features for faster iteration:
Bypass Phase 3 and Phase 4 for testing
Disable FaceDetailer passes
Disable upscaling
Reduce steps per phase (20/15/12/12). Though, this will affect quality of images.
Use lower resolution for prompt testing
Test on faster scheduler (euler vs dpmpp)
Ensure SSD storage (not HDD)
FaceDetailer Not Detecting Faces
Symptom: FaceDetailer nodes run but faces unchanged
Solutions:
Verify face is clearly visible and forward-facing
Check bbox detection model loaded correctly
Adjust FaceDetailer
bbox_threshold(try 0.5)Verify SAM model loaded properly
Check
detection_hintis set to "enabled"Try different face at different angle
Ensure face is reasonably sized in composition
The 80/20 Rule
80% of your best images come from 20% of your generations
That's NORMAL
Generate more
Sort ruthlessly
Only show the masterpieces
Don't get discouraged by the 80%. They're part of the process.
📚 Additional Resources
Documentation
Included Files:
SDXL_4_Phase_Super_Refiner_V1.json- Main workflowsdxl_image_settings_controller.py- Settings controller nodemulti_phase_prompt_manager.py- Prompt manager nodevae_selector.py
This README
📄 License & Credits
Workflow Designer: DarthRidonkulous
Custom Nodes: Developed with AI assistance (Claude, Anthropic)
Testing: Extensive production validation across model families. Thousands of images generated in testing.
Usage Terms
✅ Allowed:
Free to use and modify for personal projects
Free to use for commercial projects
Share and distribute modified versions
Use custom nodes in other workflows
Create derivative workflows
❌ Not Allowed:
Claiming original authorship
Selling workflow as-is without modification
Removing attribution from custom nodes
Attribution
Credit appreciated but not required. If sharing your results:
Mention "4-Phase Super Refiner by DarthRidonkulous"
Link to CivitAI post
Tag @DarthRidonkulous on social media
Share in CivitAI comments section
💬 Support the Creator
If you find this workflow valuable:
Share Your Work:
Post results on CivitAI with workflow credit
Share on social media with attribution
Help other users in comments section
Provide Feedback:
Leave detailed reviews
Report bugs constructively
Suggest features for future versions
Share your configuration discoveries
Join the Community:
Follow on CivitAI for updates
Participate in discussions
Share workflow tips and tricks
Help troubleshoot for other users
🙏 Acknowledgments
Special Thanks:
ComfyUI development team for the platform
Custom node developers for extensibility
Beta testers for feedback and validation
CivitAI community for support and inspiration
Model creators for excellent SDXL checkpoints
Built With:
ComfyUI workflow framework
Impact Pack for FaceDetailer
LoRA Manager for visual interface
rgthree nodes for Power Prompts
pysssss scripts for utilities
🎉 Let's Create Something Amazing
The SDXL 4-Phase Super Refiner V1 is about one thing: giving you creative superpowers.
This isn't a corporate production tool. This is a playground where you can:
Mix styles that shouldn't exist
Transform reality into fantasy (or vice versa)
Stack 12 LoRAs and see what happens
Generate hundreds of variations on a theme
Discover your signature aesthetic
Create art that's uniquely YOURS
This Workflow is For:
The Experimenters who want to push boundaries and see what's possible
The Artists who have a vision and need the tools to realize it
The Collectors who want to generate massive galleries of diverse art
The Perfectionists who want every detail exactly right
The Chaos Agents who randomize everything and sort through gold later
The Style Hunters looking to create hybrid aesthetics no one else has
The Character Designers who need consistency across multiple refinements
The NSFW Creators who need privacy and control (we see you, no judgment)
What Makes This Different
Most workflows give you ONE shot to get it right. This one gives you FOUR chances to:
Refine your vision
Change direction completely
Experiment with different models
Layer different LoRA combinations
Build complexity progressively
Save every phase of evolution
It's not about following a formula. It's about having the freedom to create however YOU want.
The Community Aspect
Share your discoveries:
Post your wildest style combinations
Show your before/after transformations
Explain your LoRA orchestration
Share your favorite denoise patterns
Help others learn from your experiments
Learn from others:
Check the comments for creative techniques
See how people are using different model combos
Find new LoRAs to experiment with
Discover approaches you hadn't considered
Contribute back:
Share workflow modifications
Post your settings for specific styles
Help troubleshoot issues
Celebrate each other's creations
A Note About "Production"
Yes, this workflow CAN produce professional-grade, print-ready, portfolio-quality images. But that's not WHY it exists.
It exists because creativity thrives with:
Freedom to experiment
Control over every variable
Flexibility to change direction
Power to realize any vision
Tools that get out of your way
If you happen to sell your art, great. If you're making references for your game, awesome. If you're just creating for the pure joy of it, that's perfect too.
What You Should Do Next:
Download the workflow
Start with Phase 1 only
Get comfortable, then get weird
Share what you create
Help others in comments
Push the boundaries and see what breaks
Final Thoughts
Hundreds of hours went into building this workflow, testing it, breaking it, fixing it, and refining it. Not to create a production tool, but to create a creative instrument.
Think of it like a guitar—it has strings, frets, and pickups. But what you PLAY on it? That's all you.
This workflow has phases, denoise values, and LoRA controls. What you CREATE with it? That's all you.
So go create something weird. Something beautiful. Something that shouldn't exist but does because you made it exist.
That's what this is all about.
See you in the comments. Show me what you make. 🚀
Workflow Version: 1.0
Documentation Version: 1.0
Last Updated: January 2025
Created by: DarthRidonkulous
Built with: ComfyUI + hundreds of hours of experimentation
Made for: Creators, experimenters, and artists who want MORE