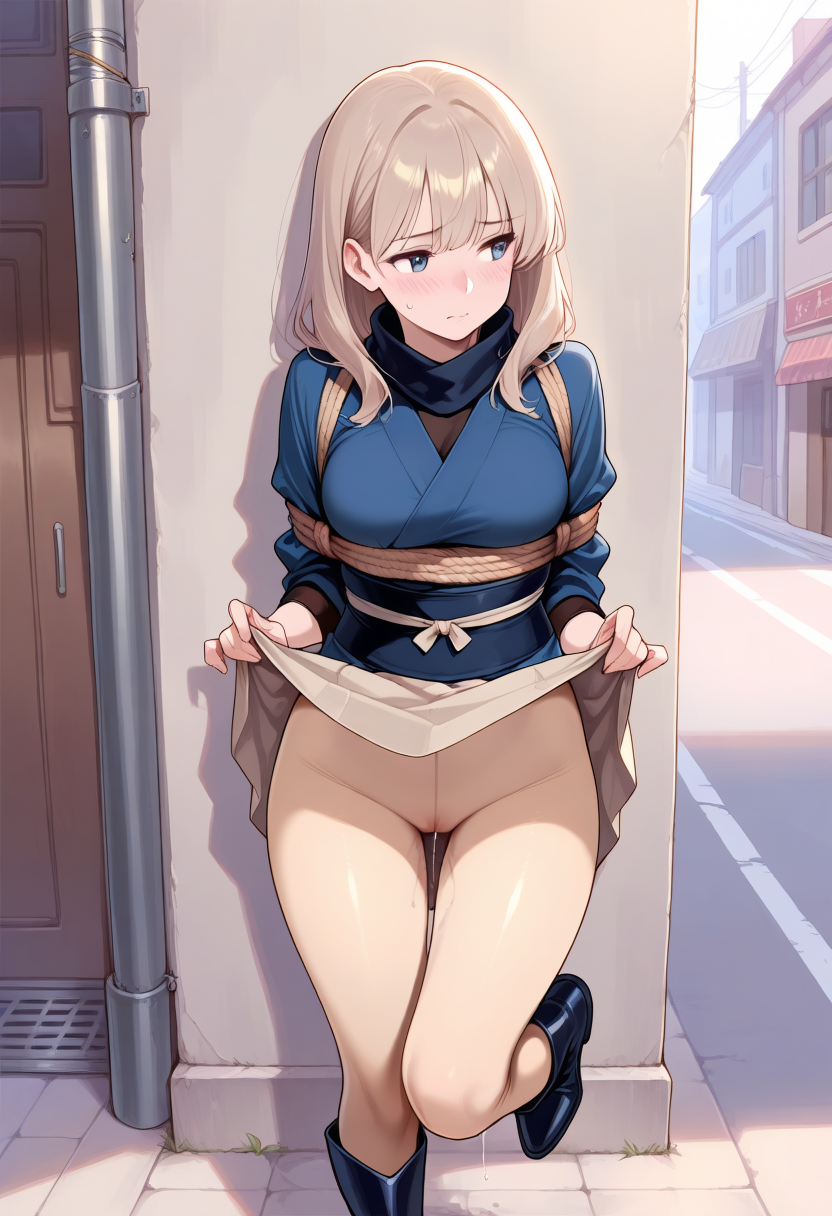
Lab @10 : nude pantyhose, natural pantyhose, with cotton or shiny controlling


Details
Download Files (1)
Model description
Intro
This is a lora lab following the previous Lab 1 => 2 => 3 => 4 ( in which I was trying to fix the "potentially black pantyhose" thing )
However, my main question of this series is HOW COULD I KEEP ENHANCING THE QUALITY & EFFECT OF CERTAIN LORA ?
By distilling from my previous LoRA, now lab_10_4 is kinda acceptable for now ( but still, it's not fully tested yet. I will keep testing around, but play and enjoy if you like )
WHICH BASE MODEL ?
REMEMBER to switch to the correct base model
for 10-04, 10-10, 10-11 :
更新
overall
lora 文档 (先中文 => 后英文, 可按需阅读)
lora documentation (Chinese first => English second, read as needed)
250425
上传更新 : OK 10_11, BAD 10_10, fixed dataset & regset
Upload update: OK 10_11, BAD 10_10, fixed dataset & regset
提供训练的思路
Provide training ideas
如何使用
简而言之:
使用 beige pantyhose
如果感觉没有"肤色感",可加上较弱的 [[yellow pantyhose]](权重可以再调整)
use
beige pantyhoseand maybe somehow add [[yellow pantyhose]] can make it "a bit naturally nude" ( weight should you try around )
lora 权重,感觉 0.5~0.6 就差不多了
for lora weight, maybe 0.5 ~ 0.6 ( the dataset is to be fixed on next round to make the color more natural )
使用 sheer golden pantyhose, 而非 单独 golden pantyhose ( golden pantyhose 的数据图片不是太好, 颜色过黄而不自然 从 benchmark 中也可以看出 )
sheer golden pantyhosemight be used, but never usegolden pantyhosealone! ( it's too strong, as I figure out that the dataset is not that good ... you can see from the benchmark or dataset uploaded )
优化与发现
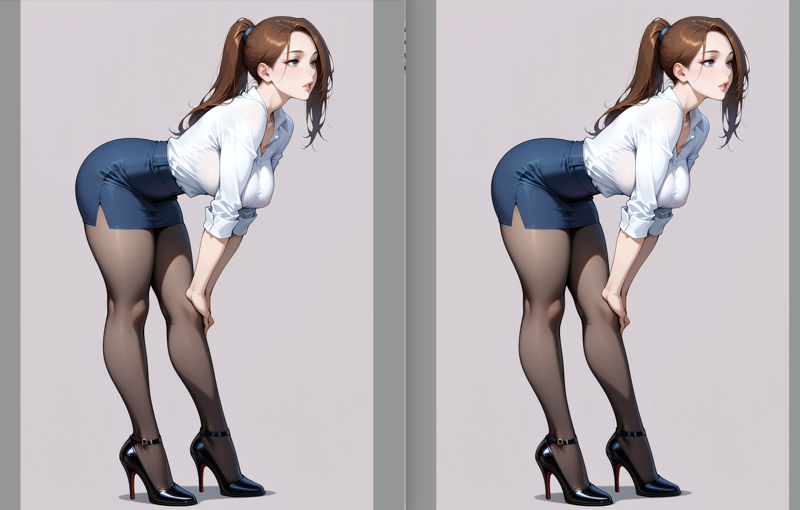
首先, 展示一下 04 => 10 => 11 的 benchmark 的其中一个对比.
First, let's see the improvements from 04 to 10 to 11.
04 : with weight increase, the image's structure change significantly and a lot of pitfalls can be pinpointed

10 : basic structure keeps ok... but still, the bad reg set kinda mess the image up
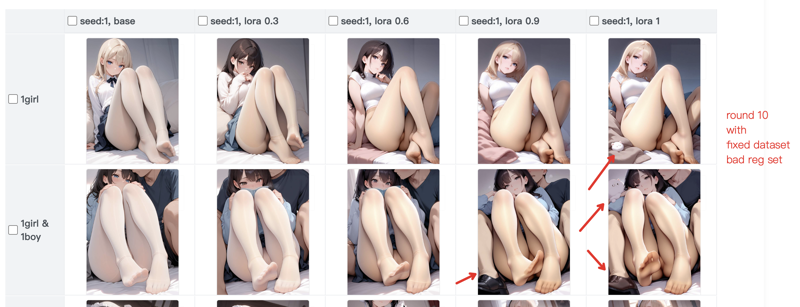
11 : As it shows, although the color becomes strange ( due to the dataset's color problem ), the image remains stable. There's fewer nonsense problem can be found.

下面列举本次 lora 训练的改进方式,方便有兴趣训练 lora 的人参考。
1) (非常重要) 图片质量问题可能存在于细节
下面是两个对比例子
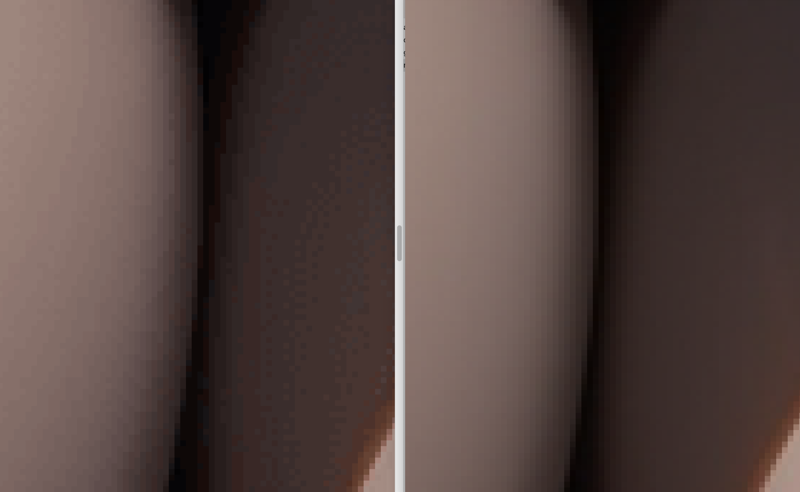
example 1 : 仔细看整体 & 左侧(有问题) 衣物像素的抖动
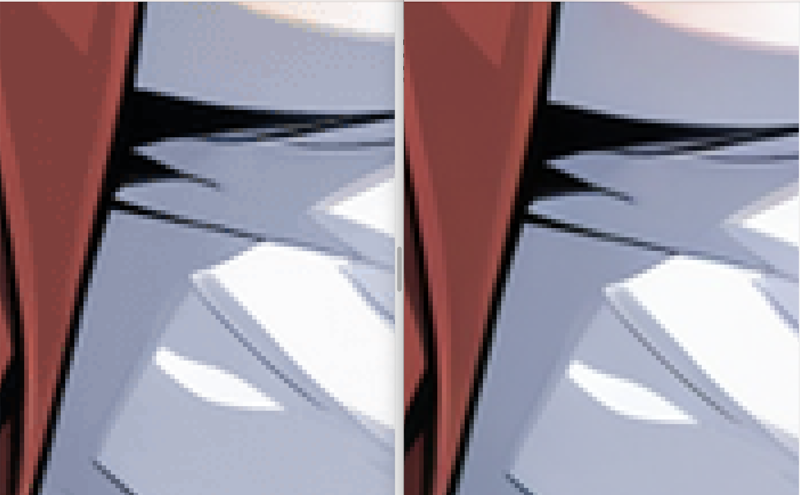
example 2 : 丝袜区域放大后, 左侧 (有问题) 的颜色梯度变化
可以看到,从整体画面是没什么大问题,但由于我为了提升图片质量 (下述的 2) ),之前进行的方式是:
先生成原始图片
再 img2img & adetailer 放大 1.5 倍
再用程序缩小回训练的尺寸 <=== 这一步出的问题
检查图片质量时,我没有放大到像素级别,否则我会看到很多的噪点和颜色抖动。
人感知不到,而 sd 模型是能充分感知到的。
我将 3 次的一些对比实验也给出:
10_11:fixed dataset & reg set
10_10:only fixed dataset & wrong reg set
10_04:wrong dataset & reg set
你可以看到,10_04 在权重提升时,图片构图变化巨大,且这种变化是毫无意义的...
如果你恰好也用程序 (nodejs sharp 依赖) 进行 png 处理, 那么可参考如下:
const sharpInstance = sharp(inputPath)
    .resize(
        width,
        height,
        {kernel: sharp.kernel.lanczos3}
    )
    .png({
        quality: 100,
        // 0~9 is all lossless compression, 9 is better
        compressionLevel: 9,
        // @note. ****** very very very important ******
        palette: false
    });
2) 图片质量的一个技巧处理
虽然 2) 是导致 1) 出现的原因,但我还是想推荐它:
一开始我获取一些用于 reg 的图片,是直接用训练的尺寸,生成一批图,然后从里面挑选。
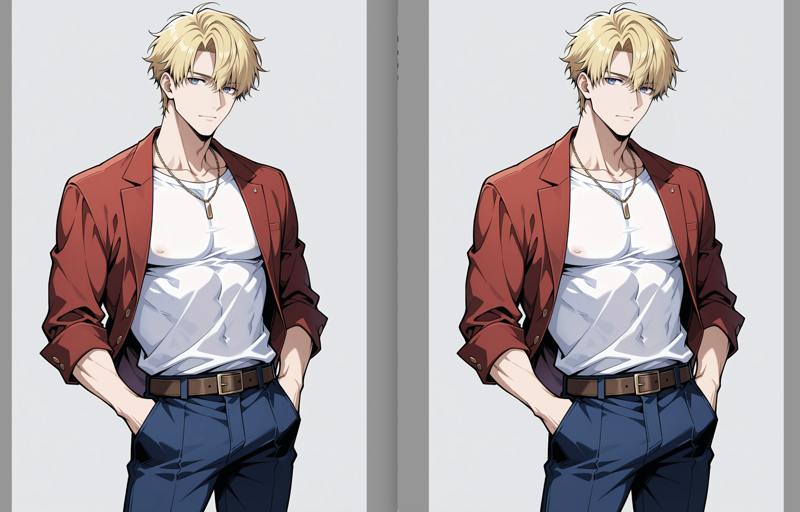
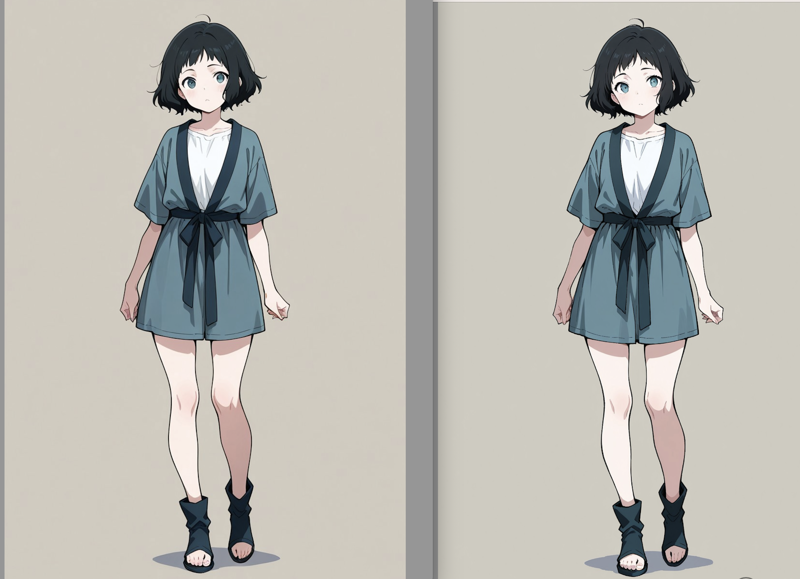
但后来发现,先 highres fix,或者用 img2img 放大,图片在宏观上的质量会有明显提升,尤其在人物较小的情况下,如下图 (左侧是未经放大再缩小的) :

所以,这个处理思路就是:
先根据 prompt 生成一大批图片,再选择一批合理且符合预期的图片
img2img & adetailer 放大
再缩小到训练尺寸
3) reg set 的管理
reg 的收集也和 dataset 一样花时间,而且单次训练中,它的数量需求更大,有可能花费更多时间。
但好消息是,大多数质量好的 reg set,可以在不同的训练里重复复用 🤩;可惜又有个坏消息是,为了这种重复利用,管理它们也是个头大的事情。😂
经验证发现:
(至少在 mac & linux 环境下)软链方式下,图片等资源,也能正常作为资源文件被训练脚本使用。
所以推荐以下方式:
准备一个文件夹(结构大致如下):
my_reg_set/
all_images/
1girl/ ...(可能几百张图片,png + captions,甚至有 npz 文件好像是 latent cache??)...
1boy/ ...
train_plans/
reg-my-tran-1/
1_1girl/ ...
1_1boy/ ...
让 AI 写一个脚本,接受一系列参数如 "train:new-test, reg:1girl=200,1boy=100,..." 这样
这个脚本,可以自动创建好 reg-new-test,并从指定的 category 里挑选指定数量的图片,创造软链到这个 reg-new-test 文件夹中
甚至可以追加处理逻辑,当要的 reg 图片多于现有某个 category 的图片,可以自动处理成如下效果:
比如 1girl=100,但现在库存只有 24,那么最终得到:
4_1girl_full/ ...
1_1girl_rest/ ...(最后4张额外图片)
上面这个过程,会让你感觉更加舒服。
How to Use
In short:
Use beige pantyhose
If you feel there's no "skin tone," you can add a weaker [[yellow pantyhose]] (weight can be adjusted)
For lora weight, 0.5 ~ 0.6 seems sufficient
Use 'sheer golden pantyhose', instead of 'golden pantyhose' alone
Optimization and Findings
Below are improvements made during this lora training, which may be helpful for those interested in training lora.
1) (Very Important) Image Quality Issues May Exist in Details
Here are two comparison examples
example 1: Carefully look at the overall & left side (problematic) clothing pixel jitter
example 2: After enlarging the pantyhose area, the color gradient changes on the left side (problematic)
As you can see, there's no major problem with the overall image, but because I wanted to improve image quality (as mentioned in 2) below), my previous approach was:
First generate the original image
Then use img2img & adetailer to enlarge it by 1.5 times
Then use a program to reduce it back to training size <=== This step caused the issue
When checking image quality, I didn't zoom in to the pixel level, otherwise I would have seen a lot of noise and color fluctuations.
Humans can't perceive this, but the sd model can fully detect it.
I also present some comparison experiments from 3 attempts:
10_11: fixed dataset & reg set
10_10: only fixed dataset & wrong reg set
10_04: wrong dataset & reg set
You can see that in 10_04, when the weight increases, the image composition changes dramatically, and this change is meaningless...
If you happen to use a program (nodejs sharp dependency) for png processing, you can refer to the following:
const sharpInstance = sharp(inputPath)
    .resize(
        width,
        height,
        {kernel: sharp.kernel.lanczos3}
    )
    .png({
        quality: 100,
        // 0~9 is all lossless compression, 9 is better
        compressionLevel: 9,
        // @note. ****** very very very important ******
        palette: false
    });
2) A Technique for Image Quality Processing
Although 2) is the cause of 1), I still want to recommend it:
Initially, to get some images for reg, I directly used training-sized images, generated a batch, and selected from them.
But later I found that using highres fix first, or enlarging with img2img, significantly improves the image quality on a macro level, especially when characters are small, as shown below ( left is without upscale and downscale ):
So, this processing approach is:
First generate a large batch of images based on prompts, then select a batch that is reasonable and meets expectations
Enlarge with img2img & adetailer
Then reduce back to training size
3) Management of reg sets
Collecting reg sets takes as much time as datasets, and in a single training session, it requires more quantity and potentially more time.
The good news is that most high-quality reg sets can be reused in different trainings 🤩; unfortunately, managing them for such reuse can be challenging 😂.
I've verified that:
(At least in mac & linux environments) resources like images can be normally used by training scripts when using symbolic links.
So I recommend the following approach:
Prepare a folder (structure approximately as follows):
my_reg_set/
all_images/
1girl/ ... (possibly hundreds of images, png + captions, even npz files which seem to be latent cache??) ...
1boy/ ...
train_plans/
reg-my-tran-1/
1_1girl/ ...
1_1boy/ ...
Have AI write a script that accepts parameters like "train:new-test, reg:1girl=200,1boy=100,..."
This script can automatically create reg-new-test and select the specified number of images from the specified categories, creating symbolic links to this reg-new-test folder
It can even add processing logic for when the required reg images exceed the available images in a category, resulting in something like:
For example, if 1girl=100, but current stock only has 24, then you ultimately get:
4_1girl_full/ ...
1_1girl_rest/ ... (the last 4 extra images)
The process above will make you feel more comfortable.
==== previous doc ====
How to use
What's the trigger tokens ? ( for better understanding )
In my dataset (which will be published as well), I use the following trigger tokens:
// for controlling the color
golden pantyhose // more yellow toned
Be aware that golden pantyhose is kinda "too strong" in style
beige pantyhose
// for controlling shininess
cotton pantyhose
shiny pantyhose
How the actual result? ( I might keep updating when testing the LoRA ... )
NOTE : the dataset are mainly depicting "legging", and also tends to "nsfw"
so, if you found torn / see-through is not proper, you can specify them explicitly on NEGATIVE PROMPT ( or POSITIVE PROMPT if you do want them )
NOTE : I found the weight 0.6 ~ 0.8 is better, with higher weight, the LoRA will kinda introduce more unrelated details from the dataset (which does not make sense from time to time)
v3
the closest effect as I expect of nude pantyhose (MAYBE?)
pos : sheer pantyhose,[yellow pantyhose], beige pantyhose,shiny pantyhose,
neg : torn,[golden pantyhose],
v2
pos: beige pantyhose, cotton pantyhose,v1
pos: golden pantyhose, shiny pantyhose, sheer pantyhose,
neg: (oily pantyhose),
What tags you can try on pos / neg prompts ?
beige pantyhose,
cotton pantyhose,
shiny pantyhose,
oily pantyhose, // mainly put in neg, otherwise too oily
golden pantyhose, // sometimes you can consider putting it on neg
< to be continue >