WAN2.2 IMAGE InPainting - ComfyUI Workflow


Details
Download Files (1)
Model description
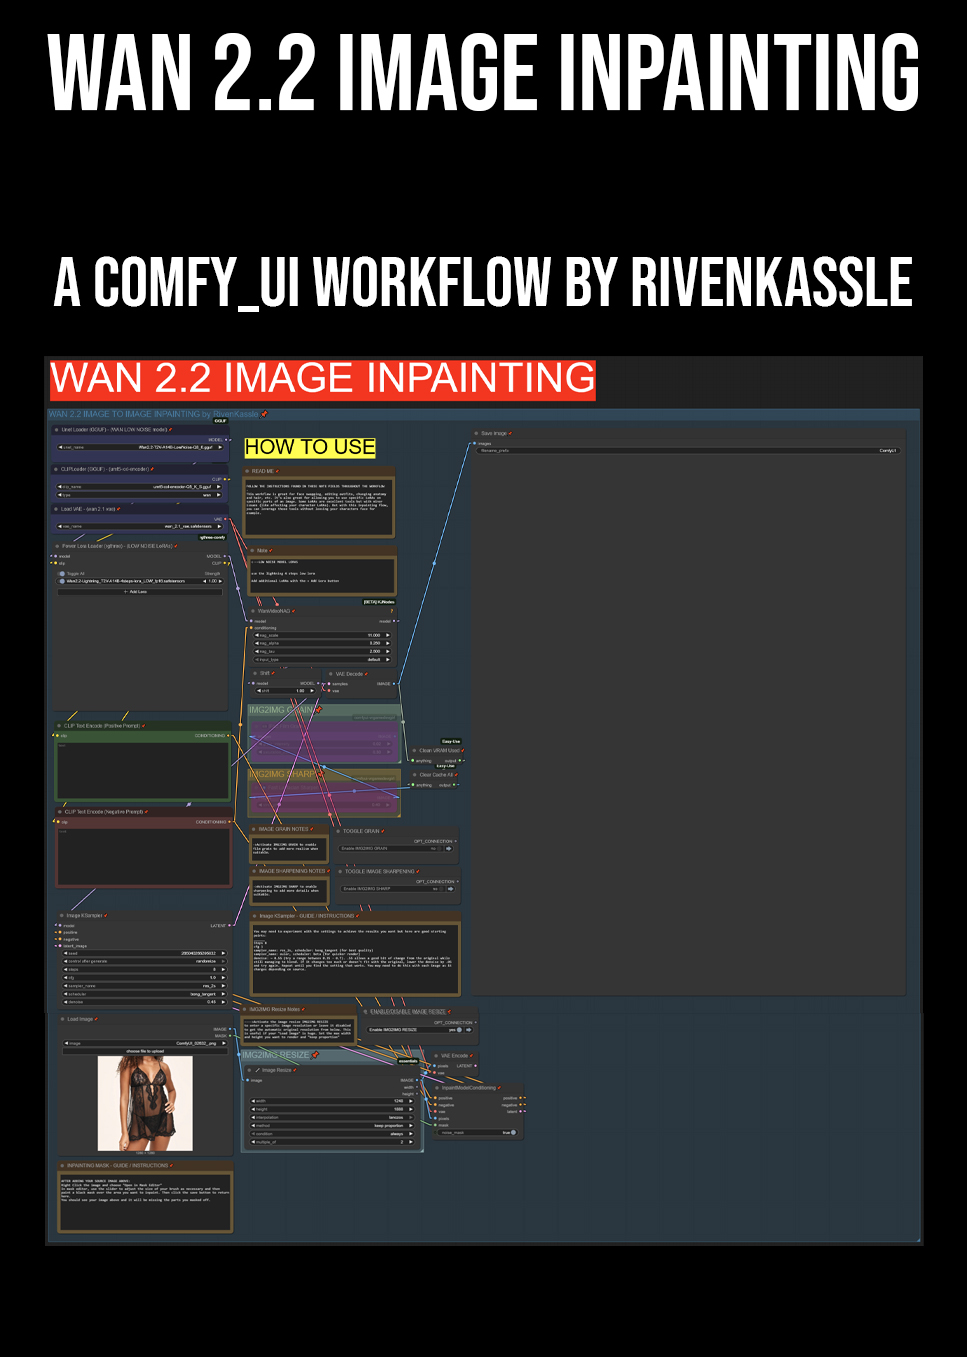
I created a workflow for inpainting with WAN 2.2. It would work for WAN 2.1 as well but WAN 2.2 is superior for image creation.
The workflow has easy to follow notes and instructions embedded so anyone should be able to use it.
_______
Sometimes with WAN 2.2 LoRAs, you need the perfect starting image to get the most use from them. Being able to inpaint in WAN and edit specific areas of the image makes it easy to get that Start Image you need for videos. InPainting also helps you use any LoRA you want to use and still retain your character likeness because you can inpaint their face/head/etc back onto the image.
______
How to use the workflow
Load your starting image that you want to inpaint on.
Load any LoRAs you want to use to influence your inpainting generations (character, anatomy, outfit, action)
Mask your starting image: right-click the image you loaded and choose "Open in MaskEditor". Adjust your brush size accordingly and paint over the portion of the image that you want to inpaint over. Click save when you're done.
Write a prompt for what you want to see in the masked area. Use typical image prompt language like "she is wearing a white off the shoulder crop top" - if you mask also covers parts of your image that you don't want to change, describe those too. For example: if you're changing her hair but her hair falls over her clothing that you want to keep, describe the hair you want AND the clothing you want to keep.
Set an appropriate denoising strength: this will vary and can take some trial and error. If it's a minor change, a strength of 0.4-0.6 is usually ideal. If it's a strong change, like changing black leggings into a miniskirt with bare thighs, you may need a stronger denoise up to 0.8. This could take several generations to get what you're looking for because a stronger denoise affects the image a lot more. Pay attention to where your mask is and edit it when needed. If a strong denoise is disconnecting a bicep from a shoulder because of a shirt change, you may need to mask the shoulder and bicep and let it all generate together. Practice and you'll get the hang of it.
Other notes and instructions are found throughout the workflow and include things like Image resize, sampler and scheduler, option noise grain and sharpening (helps match the look of certain images you may be inpainting).
I usually queue up 4 images back to back so I can choose the best amongst them.
What this workflow does and doesn't do
This workflow creates a mask at the latent layer allowing you to add noise to a specific area you mask for inpainting without touching the rest of your original image. Excellent for making coordinated changes
This workflow does not feed contextual reference images into the pipeline like you may be familiar with from Flux Kontext or Google's Nano Banana. If you want to put a certain character's outfit onto your image, you'll need a character LoRA that knows the outfit.