Max quality QWEN Edit 2509 outputs, minimal workflow, and lots of info


詳細
ファイルをダウンロード (1)
このバージョンについて
モデル説明
UPDATE FOR QWEN EDIT 2511
You can find it here on normal civitai:
Or civitai red here:
https://civitai.red/models/2659067/max-quality-qwen-edit-2511-outputs-minimal-workflows-lots-of-info
I had to upload it as a new post because this one got perma-flagged as being for civitai red only, which is incorrect as there's nothing inherently NSFW about the workflows.
Don't bother liking or commenting on this old post, I'd rather not confuse anyone further!
The rest of this post (and the workflows) are obsolete now, 2511 is entirely better than 2509.
Important:
If you're new here, start with the qwedit_simple workflow. Don't use the multi-image ones until you know how the single image one works.
Updates
This section is to keep track of version updates. The main post is directly below the update section. I haven't updated the main post yet - the new information is here in the update section for now.
UPDATE 2025-10-14: Multi Image Workflows
The original post is below this. I've added two new workflows for 2 images and 3 images. It took a while because it ended up being complicated to figure out the best way to do it, and also I was very busy IRL this past week. But, here we are. Enjoy!
There are also extra notes about the new lightning loras and such in this update section as well. Spoiler: they're bad :(
--Usage Notes--
Spaghetti: The workflow connections look like spaghetti because each ref adds several nodes with cross-connections to other nodes. They're still simple, just not pretty anymore.
Order: When inputting images, image one is on the right. So, add them right-to-left. They're labelled accordingly.
Use the right workflow: Because of the extra nodes, it's inconvenient 'bypassing' the 3rd or 2nd images correctly without messing it up. I'd recommend just using the three workflows separately rather than trying to do all three flexibly in one.
Multi image gens are slow as fuck: The quality is maximal, but the 2-image one takes 3x longer than 1-image does, and the 3-image one takes 5x longer.
This is because each image used in QWEN edit adds a 1x multiplier to the time, and this workflow technically adds 2 new images each time (thanks to the reference latents)
If you use QWEN edit without the reference latent nodes, the multi image gens take 2x and 3x longer instead because the images are only added once - but the quality will be blurry, so that's the downside
Note that this is only a problem with the multi image workflows; the qwedit_simple workflow with one image is the same speed as normal qwen edit
Scaling: Reference images don't have as strict scaling needs. You can make them bigger or smaller. Bigger will make gens take longer, smaller will make gens faster.
Make sure the main image is scaled normally, but if you're an advanced user you can scale the first image however you like and feed in a manual-size output latent to the k-sampler instead (as described further below in "Advanced Quality")
Added optional "Consistence" lora: u/Adventurous-Bit-5989 on reddit suggested this lora
Link here, also linked in the workflow
I've noticed it carries over fine details (such as tiny face details, like lip texture) slightly better
It also makes it more likely that random features will carry over, like logos on clothes carrying over to new outfits
However, it often randomly degrades quality of other parts of the image slightly too, e.g. it might not quite carry over the shape of a person's legs well compared to not using the lora
And it reduces creativity of the model; you won't get as "interesting" outputs sometimes
So it's a bit of a trade-off - good if you want more fine details, otherwise not good
Follow the instructions on its civitai page, but note you don't need their workflow even though they say you do
--Other Notes--
New 2509 Lightning Loras
Verdict is out, they're bad (as of today, 2025-10-14)
Pretty much the same as the other ones people have been using in terms of quality
Some people even say they're worse than the others
Basically, don't use them unless you want lower quality and lower prompt adherence
They're not even useful as "tests" because they give straight up different results to the normal model half the time
Recommend just setting this workflow (without loras) to 10 steps when you want to "test" at faster speed, then back to 20 when you want the quality back up
Some people claim to have fixed the offset issue
Maybe they have, maybe they haven't - I don't know because none of them have provided any examples or evidence
Until someone actually proves it, consider it not fixed
I'll update this & my reddit post if someone ever does convincingly fix it
-- END OF UPDATE SECTION --
What is this?
At current time, there are zero workflows available that output the highest-possible-quality 2509 results at base. This workflow configuration gives results almost identical to the official QWEN chat version.
Also, all of the other ones are very complicated; this is an extremely simple workflow with the absolute bare minimum setup. This means you can use it as an easy starting point, extend it, or add it to other more complex workflows for the benefits.
So, in summary, this workflow provides two different things:
The configuration for max quality 2509 outputs, which you can copy to wherever
A super-simple basic workflow for starting out with no bs
There's also a ton of info about the model and how to use it below.
What's in this workflow?
Tiny workflow with minimal nodes and setup
Gives the maximal-quality results possible (that I'm aware of) from the 2509 model
Only one custom node required, ComfyUi-Scale-Image-to-Total-Pixels-Advanced
One more custom node required if you want to run GGUF versions of the model
Model Download Links
All the stuff you need. These are also linked in the workflow.
QWEN Edit 2509 FP8 (requires 22.5GB VRAM):
GGUF versions for lower VRAM:
https://huggingface.co/QuantStack/Qwen-Image-Edit-2509-GGUF/tree/main
Requires ComfyUI-GGUF, load the model with "Unet Loader" node
Note: GGUFs run slower and also give lower quality results than FP8 (except maybe Q8)
Text encoder:
It's generally not recommended using a GGUF version of this, it can have funky effects
VAE:
Reference Pic Links
Cat: freepik
Cyberpunk bartender girl: civitai
Random girl in shirt & skirt: not uploaded anywhere, generated it as an example
Quick How-To
Make sure you you've updated ComfyUI to the latest version; the QWEN text encoder node was updated when the 2509 model was released
Feed in whatever image size you want, the image scaling node will resize it appropriately
Images equal to or bigger than 1mpx are ideal
You can tell by using the image scale node in the workflow, ideally you want it to be reducing your image size rather than increasing it
You can use weird aspect ratios, they don't need to be "normal". You'll start getting weird results if your aspect ratio goes further than 16:9 or 9:16, but it will still sometimes work even then
Don't fuck with the specifics of the configuration, it's set up this way very deliberately
The reference image pass-in, the zero-out, the ksampler settings and the input image resizing are what matters; leave them alone
You can change the ksampler steps to 10 for faster gens or 30 for slower but higher quality gens
You can use GGUF versions for lower VRAM, just grab the ComfyUI-GGUF custom nodes and load the model with the "UnetLoader" node
This workflow uses FP8 by default, which requires 22.5 GB VRAM
Don't use the lightning loras, they are mega garbage for 2509
You can use them, they do technically work; problem is that they eliminate a lot of the improvements the 2509 model makes, so you're not really using the 2509 model anymore
For example, 2509 can do NSFW things whereas the lightning loras have a really hard time with it
If you ask 2509 to strip someone it will straight up do it, but the lightning loras will be like "ohhh I dunno boss, that sounds really tough"
Another example, 2509 has really good prompt adherence; the lightning loras ruin that so you gotta run way more generations
This workflow only has 1 reference image input, but you can do more - set them up the exact same way by adding another ReferenceLatent node in the chain and connecting another ScaleImageToPixelsAdv node to it
I only tested this with two reference images total, but it worked fine
Let me know if it has trouble with more than two
I can provide another workflow with more of these hooked up if you need it
You can make the output image any size you want, just feed an empty latent of whatever size into the ksampler
If you're making a NEW image (i.e. specific image size into the ksampler, or you're feeding in multiple reference images) your reference images can be bigger than 1mpx and it does make the result higher quality
If you're feeling fancy you can feed in a 2mpx image of a person, and then a face transfer to another image will actually have higher fidelity
Yes, it really works
The only downside is that the model takes longer to run, proportional to your reference image size, so stick with up to 1.5mpx to 2mpx references (no fidelity benefits higher than this anyway)
More on this in "Advanced Quality" below
About NSFW
This comes up a lot, so here's the low-down. I'll keep this section short because it's not really the point of the post.
2509 has really good prompt adherence and doesn't give a damn about propriety. It can and will do whatever you ask it to do, but bear in mind it hasn't been trained on everything.
It doesn't know how to draw genitals, so expect vague smudges or ken dolls for those.
It can draw them if you provide it reference images from a similar angle, though. Here's an example of a brand new shot it made using a nude reference image, as you can see it was able to draw properly (NSFW): https://files.catbox.moe/lvq78n.png
It does titties pretty good (even nipples), but has a tendency to not keep their size consistent with the original image if they're uncovered. You might get lucky though.
It does keep titty size consistent if they're in clothes, so if you want consistency stick with putting subjects in a bikini and going from there.
It doesn't know what most lingerie items are, but it will politely give you normal underwear instead so it doesn't waste your time.
It's really good as a starting point for more edits. Instead of painfully editing with a normal model, you can just use 2509 to get them to whatever state of dress you want and then use normal models to add the details. Really convenient for editing your stuff quickly or creating mannequins for trying other outfits.
Useful Prompts that work 95% of the time
Strip entirely - great as a starting point for detailing with other models, or if you want the absolute minimum for modeling clothes or whatever.
Remove all of the person's clothing. Make it so the person is wearing nothing.Strip, except for underwear (small as possible).
Change the person's outfit to a lingerie thong and no bra.Bikini - this is the best one for removing as many clothes as possible while keeping all body proportions intact and drawing everything correctly. This is perfect for making a subject into a mannequin for putting outfits on, which is a very cool use case.
Change the person's outfit to a thong bikini.Outputs using those prompts:
🚨NSFW LINK🚨 https://ibb.co/V005M1BP 🚨NSFW LINK🚨
I'll try and upload it to the example images so you don't need the external link to view it, I just don't know if it matters that it involves multiple prompts (I put "various" in the positive prompt).
Also, should go without saying: do not mess with photos of real people without their consent. It's already not that hard with normal diffusion models, but things like QWEN and Nano Banana have really lowered the barrier to entry. It's going to turn into a big problem, best not to be a part of it yourself.
Full Explanation & FAQ about QWEN Edit
For reasons I can't entirely explain, this specific configuration gives the highest quality results, and it's really noticeable. I can explain some of it though, and will do so below. I'll be referring to QWEN Edit 2509 as 'Qwedit' for the rest of this.
Reference Image & Qwen text encoder node

The TextEncodeQwenImageEditPlus node that comes with Comfy is shit because it naively rescales images in the worst possible way
However, you do need to use it; bypassing it entirely (which is possible) results in average quality results
Using the ReferenceLatent node, we can provide Qwedit with the reference image twice, with the second one being at a non-garbage scale
Then, by zeroing out the original conditioning AND feeding that zero-out into the ksampler negative, we discourage the model from using the shitty image(s) scaled by the comfy node and instead use our much better scaled version of the image
Note: you MUST pass the conditioning from the real text encoder into the zero-out
Even though it sounds like it "zeroes" everything and therefore doesn't matter, it actually still passes a lot of information to the ksampler
So, do not pass any random garbage into the zero-out; you must pass in the conditioning from the qwen text encoder node
This is 80% of what makes this workflow give good results, if you're going to copy anything you should copy this
Image resizing
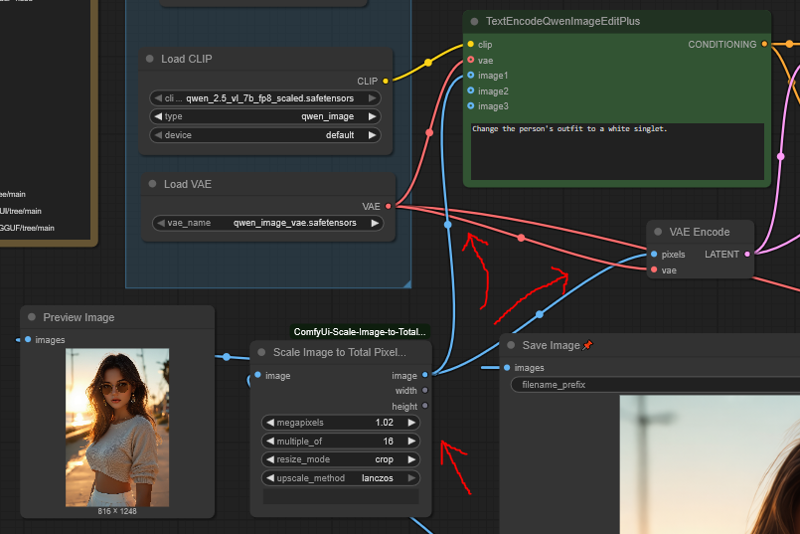
This is where the one required custom node comes in
Most workflows use the normal ScaleImageToPixels node, which is one of the garbagest, shittest nodes in existence and should be deleted from comfyui
This node naively just scales everything to 1mpx without caring that ALL DIFFUSION MODELS WORK IN MULTIPLES OF 2, 4, 8 OR 16
Scale my image to size 1177x891 ? Yeah man cool, that's perfect for my stable diffusion model bro
Enter the ScaleImageToPixelsAdv node
This chad node scales your image to a number of pixels AND also makes it divisible by a number you specify
Scaling to 1 mpx is only half of the equation though; you'll observe that the workflow is actually set to 1.02 mpx
This is because the TextEncodeQwenImageEditPlus will rescale your image a second time, using the aforementioned garbage method
By scaling to 1.02 mpx first, you at least force it to do this as a DOWNSCALE rather than an UPSCALE, which eliminates a lot of the blurriness from results
Further, the ScaleImageToPixelsAdv rounds DOWN, so if your image isn't evenly divisible by 16 it will end up slightly smaller than 1mpx; doing 1.02 instead puts you much closer to the true 1mpx that the node wants
I will point out also that Qwedit can very comfortably handle images anywhere from about 0.5 to 1.1 mpx, which is why it's fine to pass the slightly-larger-than-1mpx image into the ksampler too
Divisible by 16 gives the best results, ignore all those people saying 112 or 56 or whatever (explanation below)
"Crop" instead of "Stretch" because it distorts the image less, just trust me it's worth shaving 10px off your image to keep the quality high
Image offset problem - no you can't fix it, anyone who says they can is lying
The offset issue is when the objects in your image move slightly (or a lot) in the edited version, being "offset" from their intended locations
This workflow results in the lowest possible occurrence of the offset problem
Yes, lower than all the other random fixes like "multiples of 56 or 112"
The whole "multiples of 56 or 112" thing doesn't work for a couple of reasons:
1. It's not actually the full cause of the issue; the Qwedit model just does this offsetting thing randomly for fun, you can't control it
2. The way the model is set up, it literally doesn't matter if you make your image a multiple of 112 because there's no 1mpx image size that fits those multiples - your images will get scaled to a non-112 multiple anyway and you will cry
Seriously, you can't fix this - you can only reduce the chances of it happening, and by how much, which this workflow does as much as possible
How does this workflow reduce the image offset problem for real?
Because 90% of the problem is caused by image rescaling
Scaling to 1.02 mpx and multiples of 16 will put you at the absolute closest to the real resolution Qwedit actually wants to work with
Don't believe me? Go to the official qwen chat and try putting some images of varying ratio into it
When it gives you the edited images back, you will find they've been scaled to 1mpx divisible by 16, just like how the ScaleImageToPixelsAdv node does it
This means the ideal image sizes for Qwedit are: 1248x832, 832x1248, 1024x1024
Note that the non-square ones are slightly taller than the normal stable diffusion sizes
Don't worry though, the workflow will work fine with any reasonable aspect ratio
The last 10% of the problem is some weird stuff with Qwedit that (so far) no one has been able to resolve
It will literally do this even to perfect 1024x1024 images sometimes, so again if anyone says they've "solved" the problem you can legally slap them
Worth noting that the prompt you input actually affects the problem too, so if it's happening to one of your images you can try rewording your prompt a little and it might help
Lightning Loras, why not?
In short, if you use the lightning loras you will degrade the quality of your outputs back to the first Qwedit release and you'll miss out on all the goodness of 2509
They don't follow your prompts very well compared to 2509
They have trouble with NSFW
They draw things worse
They mess up more often when your aspect ratio isn't "normal"
They understand fewer concepts
If you want faster generations, use 10 steps instead of 20
The non-drawn parts will still look fine (like a person's face), but the drawn parts will look less detailed
It's honestly not that bad though, so if you really want the speed it's ok
Ksampler settings?
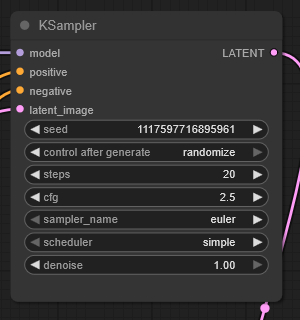
Honestly I have absolutely no idea why, but I saw someone else's workflow that had CFG 2.5 and 20 steps and it just works
You can also do CFG 4.0 and 40 steps, but it doesn't seem any better so why would you
Other numbers like 2.0 CFG or 3.0 CFG make your results worse all the time, so it's really sensitive for some reason
Just stick to 2.5 CFG, it's not worth the pain of trying to change it
You can use 10 steps for faster generation; faces and everything that doesn't change will look completely fine, but you'll get lower quality drawn stuff - like if it draws a leather jacket on someone it won't look as detailed
It's not that bad though, so if you really want the speed then 10 steps is cool most of the time
The detail improves at 30 steps compared to 20, but it's pretty minor so it doesn't seem worth it
Definitely don't go higher than 30 steps because it starts degrading image quality after that
More reference images?
This workflow has just one for simplicity, but you can add more
Add another ReferenceLatent node and image scaler node
Put the second ReferenceLatent in sequence with the first one, just after it, and hook the second image up to it (after it's passed through the resizer)
I've tested it with 2 images and it works fine, don't know about 3
Important: Reference images don't actually need to be 1mpx, so if you're feeling fancy you can input a 1.5 or 2 mpx image in as reference, provide the ksampler with a 1mpx latent input, and seriously get a higher quality result out of it
e.g. face transfers will have more detail
Note that a 2mpx reference image will take quite a bit longer to run, though
This also goes for single-image inputs, as long as you provide a 1mpx latent to the ksampler
Advanced Quality
Does that thing about reference images mean... ?
Yes! If you feed in a 2mpx image that downscales EXACTLY to 1mpx divisible by 16 (without pre-downscaling it), and feed the ksampler the intended 1mpx latent size, you can edit the 2mpx image directly to 1mpx size
This gives it noticeably higher quality!
It's annoying to set up, but it's cool that it works
How to:
You need to feed the 1mpx downscaled version to the Text Encoder node
You feed the 2mpx version to the ReferenceLatent
You feed a 1mpx correctly scaled (must be 1:1 with the 2mpx divisible by 16) to the ksampler
Then go, it just works™
What image sizes can Qwedit handle?
Lower than 1mpx is fine
Recommend still scaling up to 1mpx though, it will help with prompt adherence and blurriness
When you go higher than 1mpx Qwedit gradually starts deep frying your image
It also starts to have lower prompt adherence, and often distorts your image by duplicating objects
Other than that, it does actually work
So, your appetite for going above 1mpx is directly proportional to how deep fried you're ok with your images being and how many re-tries you want to do to get one that works
You can actually do images up to 1.5 megapixels (e.g. 1254x1254) before the image quality starts degrading that badly; it's still noticeable, but might be "acceptable" depending on what you're doing
Expect to have to do several gens though, it will mess up in other ways
If you go 2mpx or higher you can expect some serious frying to occur, and your image will be coked out with duplicated objects
BUT, situationally, it can still work alright
Here's a 1760x1760 (3mpx) edit of the bartender girl: https://files.catbox.moe/m00gqb.png
You can see it kinda worked alright; the scene was dark so the deep-frying isn't very noticeable. However, it duplicated her hand on the bottle weirdly and if you zoom in on her face you can see there are distortions in the detail. It also didn't keep both of her arms robotic. Your mileage will vary, like I said I wouldn't really recommend going much higher than 1mpx.