🎼MMAudio + 🎹ACE-Step (Music/Song Gen) Workflow for Videos

詳細
ファイルをダウンロード
このバージョンについて
モデル説明
🤡 私はワークフローを過剰に複雑にしがちです。(これは進化版とお考えください)
よりシンプルなバージョンが必要な場合は、こちらをご利用ください:
Reference & Credit :
🔗(NSFW) Dead-Simple MMAudio + RIFE Interpolation Setup for WAN 2.2 I2V
😀SeoulSeeker(CivitAI)
🪁 MMAudioを弄っていたので、このワークフローをここに公開することにしました。
12/12/25 - ACE-Step(音楽/歌の生成)付きワークフローを追加
- 動画からの音声を修正
⚠️8つのカスタムノードが必要
⚠️サブグラフ
⚠️ComfyUI デスクトップ版でのみテスト済み
✅ UI中心のワークフロー
✅ 動画からの音声アップロード
✅ ファイルからの音声アップロード
✅ 音楽/音声生成用MMAudioを2つ使用可能
✅ 音量調整
✅ アップスケーラーおよび/またはフレーム補間
✅ 水印/ロゴ(Video FPS Resamplingノード(White Rabbit)に付属しているため、そのままお使いください)
✅ 凝縮されたワークフロー
‼️カスタムノード ComfyUI-Swwan はワークフローに問題を引き起こす可能性があります。(アンインストールしてください。ワークフロー内の一部のスイッチと競合します)
‼️「Node 2.0」を無効化してください。
🎹 選択したすべてのオプション(動画からの音声アップロード、ファイルからの音声アップロード、MMAudio 1、MMAudio 2、ACE-Step)を組み合わせて使用可能
💡補間されていない動画の使用を推奨します。より高速です。ただし、任意のFPSの補間済み動画も使用できます(処理が遅くなる可能性があります)。
⚠️動画を高解像度にアップスケールした場合、メモリ不足が発生する可能性があります。
⚠️このワークフローで動画を補間する場合、出力のFPSは混乱や複雑化を避けるために固定されます。(FPSを変更 = 再生時間を変更 = MMAudioに影響)
💡MMAudioよりも、他の音声ファイルからBGM(背景音楽)を使用することをお勧めします。
(私はACE-StepでBGMを生成しています)
MMAudioは動画に非常に敏感であるため、音楽生成にはあまり適していません。たとえば、動画の遷移が音楽の流れを崩すことがあります。たまにそのブレイクがうまく機能したり、笑顔がホラー映画の音を生み出したりします。ビートやメロディが動画のアクションに合わせて変化することもあります。
たまにBGMとしてMMAudioを使用しますが、多くの試行が必要です。
📼上記の動画には埋め込みワークフローが含まれています。(動画をダウンロードしてComfyUIにドラッグ&ドロップしてください)
ComfyUIで動画からワークフローを開くには ComfyUI-VideoHelpSuite カスタムノードが必要です。
⌨️使用方法:
動画を 「📲Models Loaders & Video Upload」 サブグラフにドラッグ&ドロップしてください。
各セグメントの上部で、必要なオプションを有効化してください。
🎼MMAudio 用に簡単なプロンプトを入力するか、音楽ファイルまたは動画の音声をアップロードしてください。
- 3a. 🎼MMAudio 用に新しい音声を生成するには、「🎲New Fixed Random」をクリックしてください。
▷RUN
「🎥🎼Video Combine」で動画をプレビューしてください。
🎼MMAudio から新しい音声を生成したい場合は、3a. を繰り返し、▷RUN を押してください。
「🎞️Frame Interpolation」、「📐Upscaler」および/または「:💾Save Output」のオプションを選択し、▷RUN してください。
💿ComfyUI-MMAudioのインストール
1. Git Clone
ComfyUIのカスタムノードディレクトリに移動します。
🗂️ ComfyUI\custom_nodes
Windows:
このディレクトリにComfyUI-MMAudioをGit cloneします。
ディレクトリ内で右クリックし、「Open Terminal」を選択してください。
以下を入力:
git clone https://github.com/kijai/ComfyUI-MMAudio.git
2. インストール
デスクトップ版の場合:
ComfyUIを開き、
ComfyUI内の「🧩Manager」をクリックしてください。
「Install Missing Custom Nodes」をクリックします。
ComfyUI-MMAudioに対して「Try Fix」を選択してください。
ComfyUIを再起動してください。
ポータブル版の場合:
「python_embeded」フォルダに移動します。
ディレクトリ内で右クリックし、「Open Terminal」を選択してください。
以下を入力:
python.exe -m pip install -r ComfyUI\custom_nodes\ComfyUI-MMAudio\requirements.txt
📥MMAudio モデル/ファイルのダウンロードリンク
⚠️「🗂️: ComfyUI/models/」フォルダ内に「mmaudio」というフォルダを作成し、すべてのファイルをここに配置してください。
mmaudio_model (両方またはどちらかを取得できます。私は目的に応じて両方を使用しています)
🗂️: ComfyUI/models/mmaudio
📐アップスケーラーモデル ダウンロードリンク
📐2x アップスケーラーモデル
🗂️: ComfyUI/models/upscale_models
(2xアップスケールモデルの使用を推奨します。4xアップスケールモデルも使用できますが、処理時間が長くなる可能性があります)
🎹ACE-Stepモデルダウンロードリンク
ワークフローをロードすると、ComfyUIが不足しているモデルを通知します。ComfyUIから直接ダウンロードするか、下記リンクをご利用ください:
🎹 ace_step_v1_3.5b.safetensors
🗂️: ComfyUI/models/checkpoints
🗺️ガイド
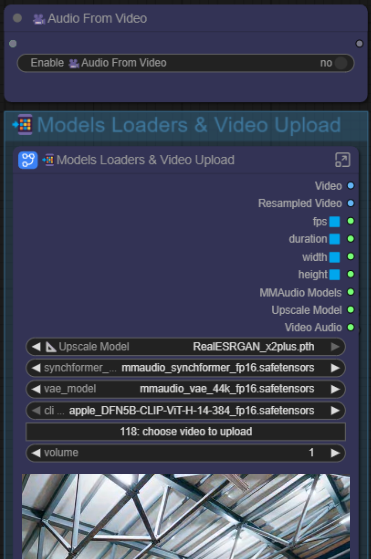
📲Models Loaders & Video Upload
🎥動画からの音声
アップロードした動画の音声を使用する場合は有効化してください。
動画のみを使用する場合は無効化してください。
📲Models Loaders & Video Upload
- 動画をサブグラフにドラッグ&ドロップしてアップロードします。サブグラフの下に動画のプレビューが表示され、マウスを動画プレビューに合わせると音声が聴けます(存在する場合)。📐アップスケールモデル - ここでアップスケールモデルを選択してください。
MMAudio synchformer_model - mmaudio_synchformer_fp16.safetensors
MMAudio vae_model - mmaudio_vae_44k_fp16.safetensors
MMAudio clip_model - apple_DFN5B-CLIP-ViT-H-14-384_fp16.safetensors
アップロードする動画を選択 - ここをクリックしてアップロードする動画を選択するウィンドウを開くこともできますし、そのままサブグラフに動画をドラッグ&ドロップすることもできます。
音量(⚠️このノードのプレビューは調整された音量を反映しません)
- 動画の音声の音量を設定します。(小数で指定)
- 1 = デフォルト
- 負の値 = 音量を下げる(例:-6)
- 1より大きい値 = 音量を上げる
📤フォルダから音声を読み込む
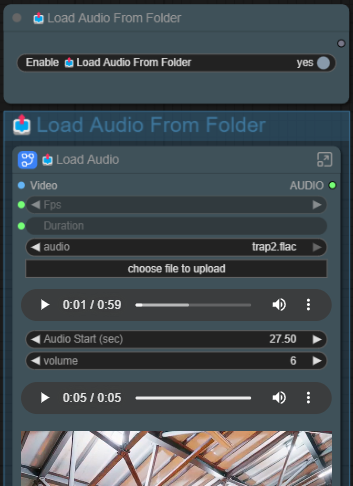 ⚠️音声/動画ファイルをアップロードするには、「choose file to upload」をクリックする必要があります。
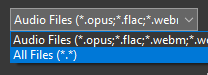
音声付き動画(動画の音声のみ読み込む)または mp3 ファイルをアップロードするには、「All Files(*.*)」を選択してください。
📤フォルダから音声を読み込む
- フォルダ内の音声ファイルを使用する場合は有効化してください。
📤音声を読み込む
choose file to upload - ここをクリックして音声ファイルまたは音声付き動画をアップロードします。
音声プレビュー(上) - 音声ファイルをアップロードした後にのみ表示されます。アップロードした音声の全長をプレビューできます。
音声開始位置 - 音声の開始秒数を入力します。
0 = 最初から
たとえば6.50と設定すると、6.5秒前の部分がカットされます。
終了位置は動画の再生時間に基づいてカットされます。音量 - 動画の音声の音量を設定します(小数で指定)
1 = デフォルト、
負の値 = 音量を下げる(例:-6)、
1より大きい値 = 音量を上げる音声プレビュー(下) - ワークフローが ▷RUN したときにのみ表示されます。音量を調整したカットされた音声をプレビューできます。
💡「⋮」(3つのドット)をクリックすると、カットされた音声を保存するオプションが表示されます。動画プレビュー - ワークフローが ▷RUN した後にのみ表示されます。使用した動画と、音量を調整したアップロード音声をプレビューできます。マウスを動画プレビューに合わせると音声が聴けます。
🎹ACE-Step
 ACE Stepは通常のKSamplerを使用して音楽を生成します。サブグラフ内に移動して、サンプラーまたはスケジューラーを変更することもできます。
🎹ACE-Step
- **🎹**ACE-Stepを使用する場合は有効化してください。
ckpt_name: ace_step_v1_3.5b.safetensors
Shift & Steps - 実験しない限り、そのままにしてください。
ボーカル音量 - ボーカルが存在する場合は音量を上げてください。
⚠️ボーカルがなくても、楽曲がインストゥルメンタルでも、必ず1に設定してください。秒数 - 曲の長さ。(推奨:60秒)
⚠️最低でも20〜30秒必要です。より長い長さにし、後で音楽の開始位置を設定するのが良いです。ACE-Stepは長さが短すぎると正しく生成できません。(5〜10秒は短すぎます)音声プレビュー(上) - ワークフローが ▷RUN した後にのみ表示されます。ACE-Stepで生成された曲の全長をプレビューできます。
💡「⋮」(3つのドット)をクリックすると、生成された曲を保存するオプションが表示されます。
💡このプレビューを使って、音楽の開始位置を探してください。🎲New Fixed Random & Seed - これをクリックして ▷RUN すると、新しい種子で新しい曲を生成できます。
音声開始位置 - 音声の開始秒数を入力します。
0 = 最初から
たとえば6.50と設定すると、6.5秒前の部分がカットされます。
終了位置は動画の再生時間に基づいてカットされます。音量 - 動画の音声の音量を設定します(小数で指定)
1 = デフォルト、
負の値 = 音量を下げる(例:-6)、
1より大きい値 = 音量を上げる音声プレビュー(下) - ワークフローが ▷RUN したときにのみ表示されます。音量を調整したカットされた音声をプレビューできます。
💡「⋮」(3つのドット)をクリックすると、カットされた音声を保存するオプションが表示されます。ACE-Step用ポジティブプロンプト - 音楽のジャンル、楽器、スタイル、ムードに関するプロンプトを入力してください。
ACE-Step用音楽構造/歌詞プロンプト - 曲を構成し、歌詞を追加するか、インストゥルメンタルに設定してください。
💡プロンプトと構造のより多くの例については、こちらをご覧ください: https://ace-step.github.io/動画プレビュー - ワークフローが ▷RUN したときにのみ表示されます。使用した動画と、音量を調整した生成されたACE-Step音楽/曲をプレビューできます。マウスを動画プレビューに合わせると音声が聴けます。
🎼最初と2番目のMMAudio
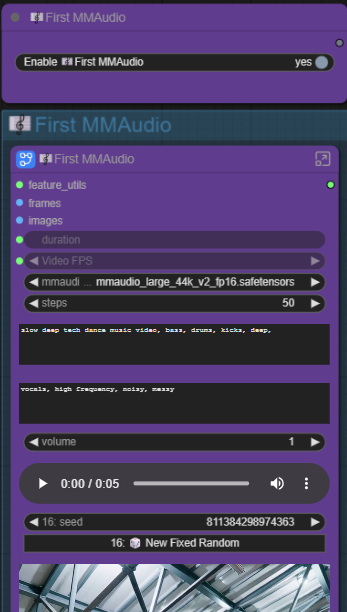
🎼最初/2番目のMMAudio
- MMAudioを使用する場合は有効化してください。
🎼MMAudio
mmaudio_model - ここでMMAudioモデルを選択または交換できます。
steps - 50ステップで十分な品質と非常に高速な処理が得られます。
ポジティブプロンプト(上) および ネガティブプロンプト(下)
- ここにプロンプトを入力してください。シンプルに、数語またはトークンで十分です。音声が生成されない場合は音声プロンプトを追加してください。不要な音声がある場合はネガティブプロンプトを追加してください。
-例:
動画にギターを弾く人物しかいないが、ドラム音がない場合、プロンプトに「drums」または「drums, snare」と追加してください。
人物に歌わせたくない場合は、ネガティブプロンプトに「vocals」と入力してください。
-⚠️完璧ではありません。数回試行が必要な場合があります。
-(プロンプトについて質問しないでください。私はまだ何が効果的で、何がプラセボかを検証中です。)音量 - 動画の音声の音量を設定します(小数で指定)
1 = デフォルト、
負の値 = 音量を下げる(例:-6)、
1より大きい値 = 音量を上げる音声プレビュー - ワークフローが ▷RUN したときにのみ表示されます。音量を調整した生成されたMMAudio音声をプレビューできます。
💡「⋮」(3つのドット)をクリックすると、生成された音声を保存するオプションが表示されます。🎲New Fixed Random & Seed - これをクリックして ▷RUN すると、新しい種子で新しい音声を生成できます。
動画プレビュー - ワークフローが ▷RUN したときにのみ表示されます。使用した動画と、音量を調整した生成されたMMAudio音声をプレビューできます。マウスを動画プレビューに合わせると音声が聴けます。
🎥🎼ビデオ音声統合
ビデオ+統合された音声(生成または使用)の出力をプレビューします。
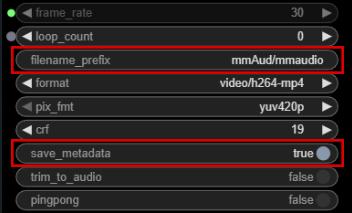
- filename_prefix
- ここでビデオ出力ファイル名を設定できます。"/"を追加するとフォルダが作成されます。
例: "mmAud/mmaudio"
ビデオは「🗂️:ComfyUI/output/mmAud/」に保存され、ファイル名は "mmaudio_00001-audio.mp4" になります。ComfyUIは自動的にファイル名の末尾に連番を追加し、"-audio"を付けて音声付きビデオであることを示します。
すべての生成されたビデオは 🗂️:ComfyUI/output に保存されます。
- save_metadata
- ▷RUN 時のワークフロー状態を保存するには有効化してください。保存されたメタデータを含む出力ビデオをComfyUIにドラッグ&ドロップすると、そのビデオのすべての入力・状態が読み込まれます。
- 無効化するとワークフローメタデータが空になります。
💡音声付きビデオを保存する際、ビデオ統合ノードは3つの出力を保存します。(音声付きビデオ、音声なしビデオ、最初のフレーム)
出力フォルダの整理をしたい場合:
ComfyUIの設定へ移動します。
左側の🎥🅥🅗🅢を選択してください。
無効化:(右側、上から2つのオプション)
"成功実行後の必要な中間ファイルを保持する"
(音声付きビデオを生成した場合、音声なしビデオも保存されます。このオプションを無効にすると、音声なしビデオは保存されませんのでご安心ください。)"メタデータ用に最初のフレームのPNGを保存する"
(上記のsave_metadataを無効にしている場合、このオプションを有効にすると、PNG(最初のフレーム)からワークフローを復元できます。)
🎞️ 📐🦄💾オプション
💡音楽やサウンドのドラフト段階では、これらのオプションを無効にできます。
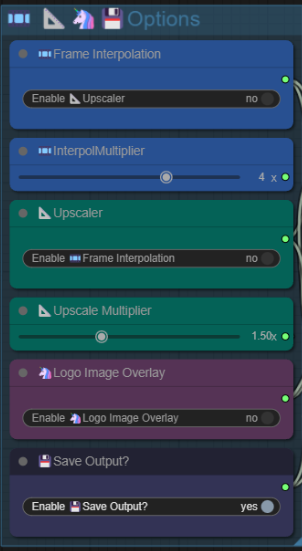
🎞️補間倍率(有効/無効)
- ビデオフレームの間にフレームを挿入して、動画をより滑らかにします。
- 3-4倍率 = 非常に滑らか
- 2倍率 = 少し滑らか、シネマティックな感じ
- 補間倍率 = 元のフレームの間に挿入するフレーム数
- 5秒のビデオ(81フレーム)に4倍率を適用すると、合計321フレームになります。
- 5秒のビデオ(81フレーム)に3倍率を適用すると、合計241フレームになります。📐アップスケーラー(有効/無効)
アップスケール係数で最終ビデオ出力の解像度を入力・調整します。
例:720x960 - 1.5倍 = 1080x1440 - 2倍 = 1440x1920🦄ロゴ画像オーバーレイ(有効/無効)
- ビデオにロゴやウォーターマークを追加します。💾出力を保存?(有効/無効)
- 有効にして ▷RUN すると、使用したビデオ+音声の結果を保存します。
💡ドラフト段階では、最初のオプションを無効にして出力フォルダの整理をできます。
💡または、(忘れやすい場合は)このオプションを有効のままにして、自分で出力フォルダを整理しても構いません。
🦄ロゴオーバーレイ(ウォーターマーク)
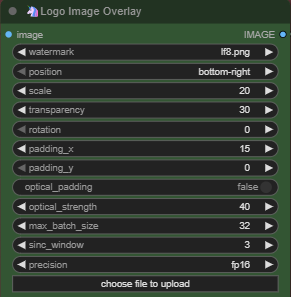
ビデオにウォーターマークを追加するには有効化してください。
ロゴ/ウォーターマーク画像をドラッグ&ドロップしてください。
透過背景の画像をサポートします。ロゴ/ウォーターマークの位置を選択してください。
ロゴ/ウォーターマークのサイズを調整してください。
不透明度 - ロゴ/ウォーターマークの透明度を調整します。
回転 - ロゴ/ウォーターマークを傾けたい場合に使用します。
パディング X - ロゴ/ウォーターマークを水平方向にずらす間隔
パディング Y - ロゴ/ウォーターマークを垂直方向にずらす間隔
その他の設定はそのままにしてください。
🧩カスタムノード:
rgthree-comfy
ComfyUI-East-Use
ComfyUI-KJNodes
ComfyUI-VideoHelpSuite
ComfyUI-Frame-Interpolation
ComfyUI-mxToolkit
WhiteRabbit
ComfyUI-MMAudio