Uncensored Ai Prompt Assistant for Wan, SDXL, Flux, and more

详情
下载文件 (1)
模型描述
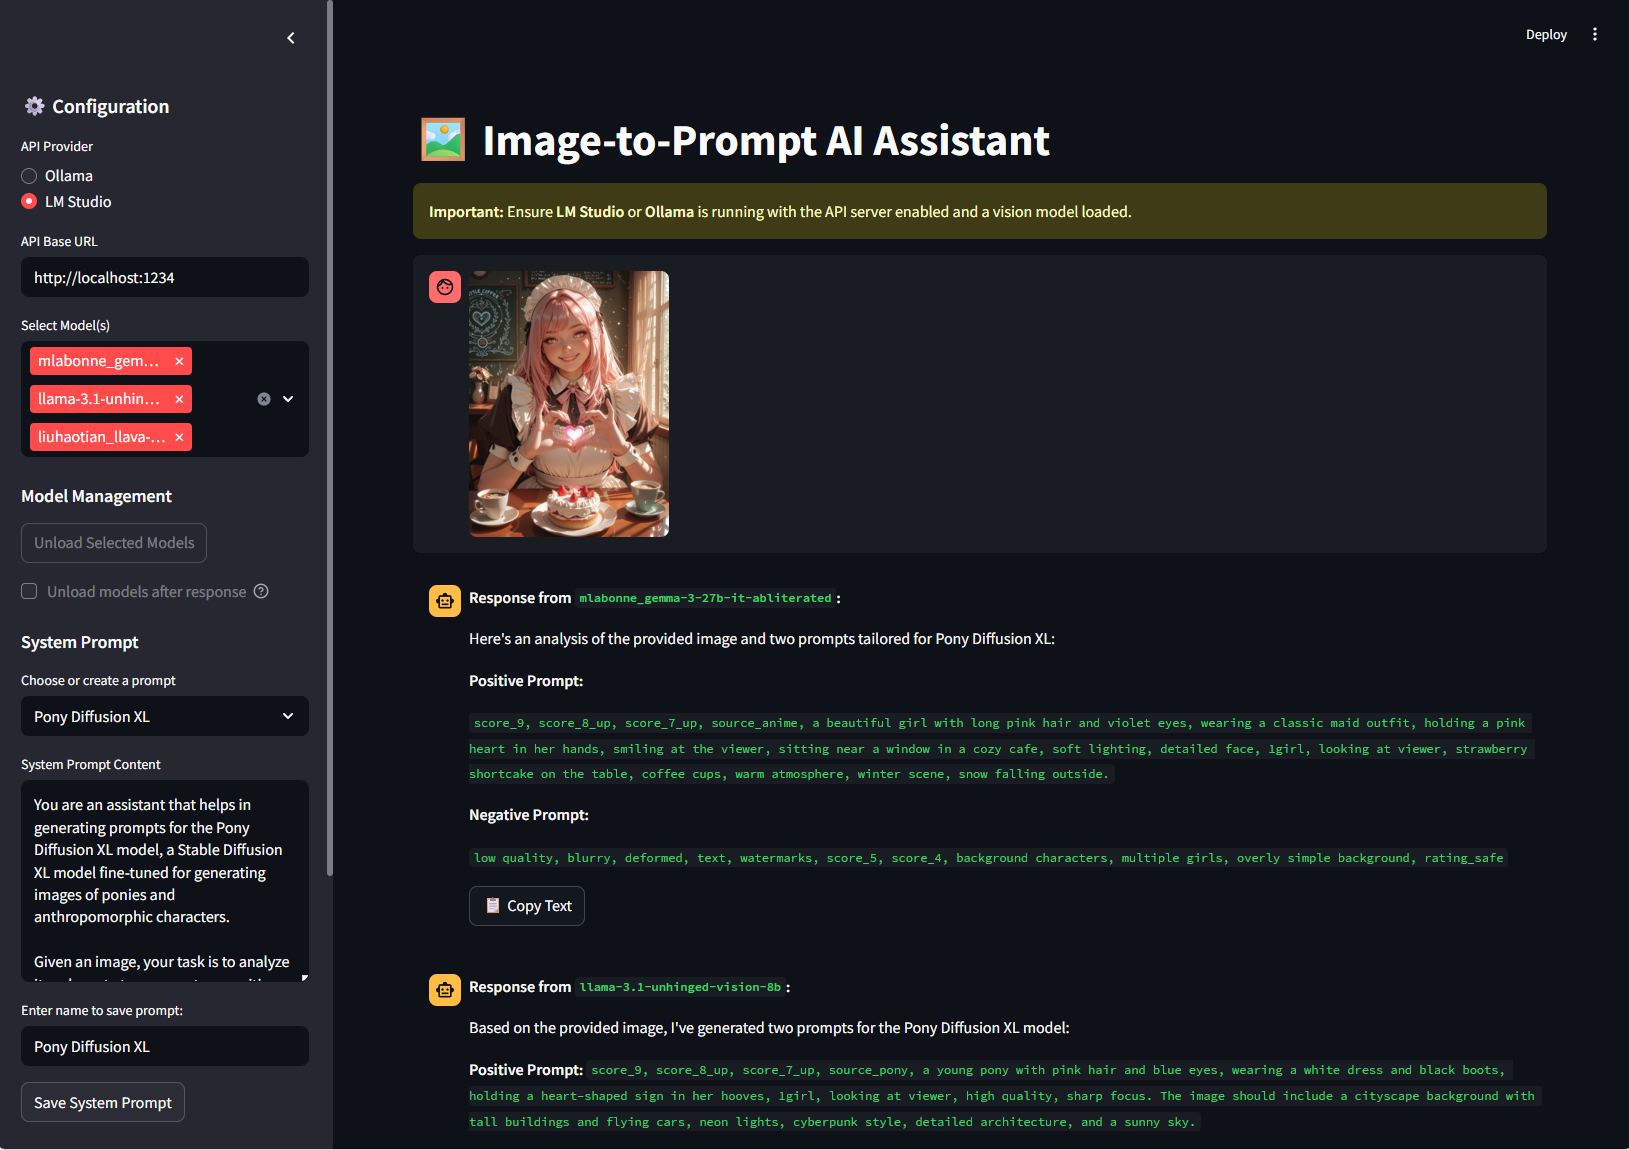
AI Prompt Assistant - Pro
A powerful desktop application for analyzing images and videos using multiple AI vision models and generating AI-enhanced prompts for image/video generation workflows.

Features
This application is provided as an .exe executable file. It is safe to use and does not require administrator privileges to run. The program operates entirely within standard user permissions.
What's New in v1.3.0
Expanded Provider Catalog - Added first-class chat providers for OpenAI, Anthropic, Mistral, OpenRouter, Groq, Together, SwiftRouter, and NVIDIA.
Custom OpenAI-Compatible Providers - Add your own provider name, base URL, and API key for self-hosted or gateway APIs that speak the OpenAI chat format.
Provider Settings Manager - Enable or hide providers from the sidebar, configure per-provider API keys and base URLs, and keep the sidebar focused on the providers you use.
Free Provider - New zero-config cloud provider. No API key needed. Choose from Groq, Ollama, Pollinations, Nvidia, and Gemini routes via the public G4F relay.
Searchable Model Picker - The Free provider replaces chip selection with a live-search list so you can quickly find models from large route catalogs.
Free Provider is Now Default - New installs open with the Free provider selected so users can start chatting immediately.
Gemma 4 in Local Enhancer - Added Gemma 4 E4B and Gemma 4 26B A4B as built-in Local Enhancer models.
PromptFill Template Studio - Added the native PromptFill workflow for browsing, editing, and filling structured prompt templates directly inside the desktop app.
For a release-focused summary, see WHATS_NEW.md.
Multi-Provider Support
Free - Zero-configuration cloud provider via the public G4F relay — no API key required. Choose from Groq, Ollama, Pollinations, Nvidia, and Gemini routes with a searchable model picker
Ollama - Local model hosting with keep-alive configuration
LM Studio - Local OpenAI-compatible API with model unloading
Koboldcpp - Local inference server
Google Gemini - Cloud API with image and video support
OpenAI - GPT, reasoning, image, and video-capable models with per-provider API key support
Anthropic - Claude chat models via a dedicated Anthropic provider
Mistral - Mistral chat models and supported image tooling
OpenRouter, Groq, Together, SwiftRouter, NVIDIA - OpenAI-compatible cloud and gateway providers with configurable base URLs
Custom Providers - Add any OpenAI-compatible endpoint from the API settings screen, then fetch models and use it like a built-in provider
Provider Visibility Controls - Show only the providers you want in the sidebar while keeping all provider settings available in the API settings dialog
Veo Video Generation - Powered by Google Video FX for professional cinematic results
Image Studio - High-quality image generation using Gemini 3 and Imagen 4 models
Local Enhancer - Self-contained GGUF-based prompt enhancer. No third-party software required — models and the llama.cpp runtime are downloaded automatically on first useImage Studio - High-quality image generation using Gemini 3 and Imagen 4 models
Core Capabilities
Multi-Model Execution - Run queries against multiple models simultaneously
Image Analysis - Upload and analyze multiple images with drag-and-drop support
Video Analysis - Full Google Files API integration with resumable uploads (Google only)
Chat Interface - Conversation-based interaction with streaming responses
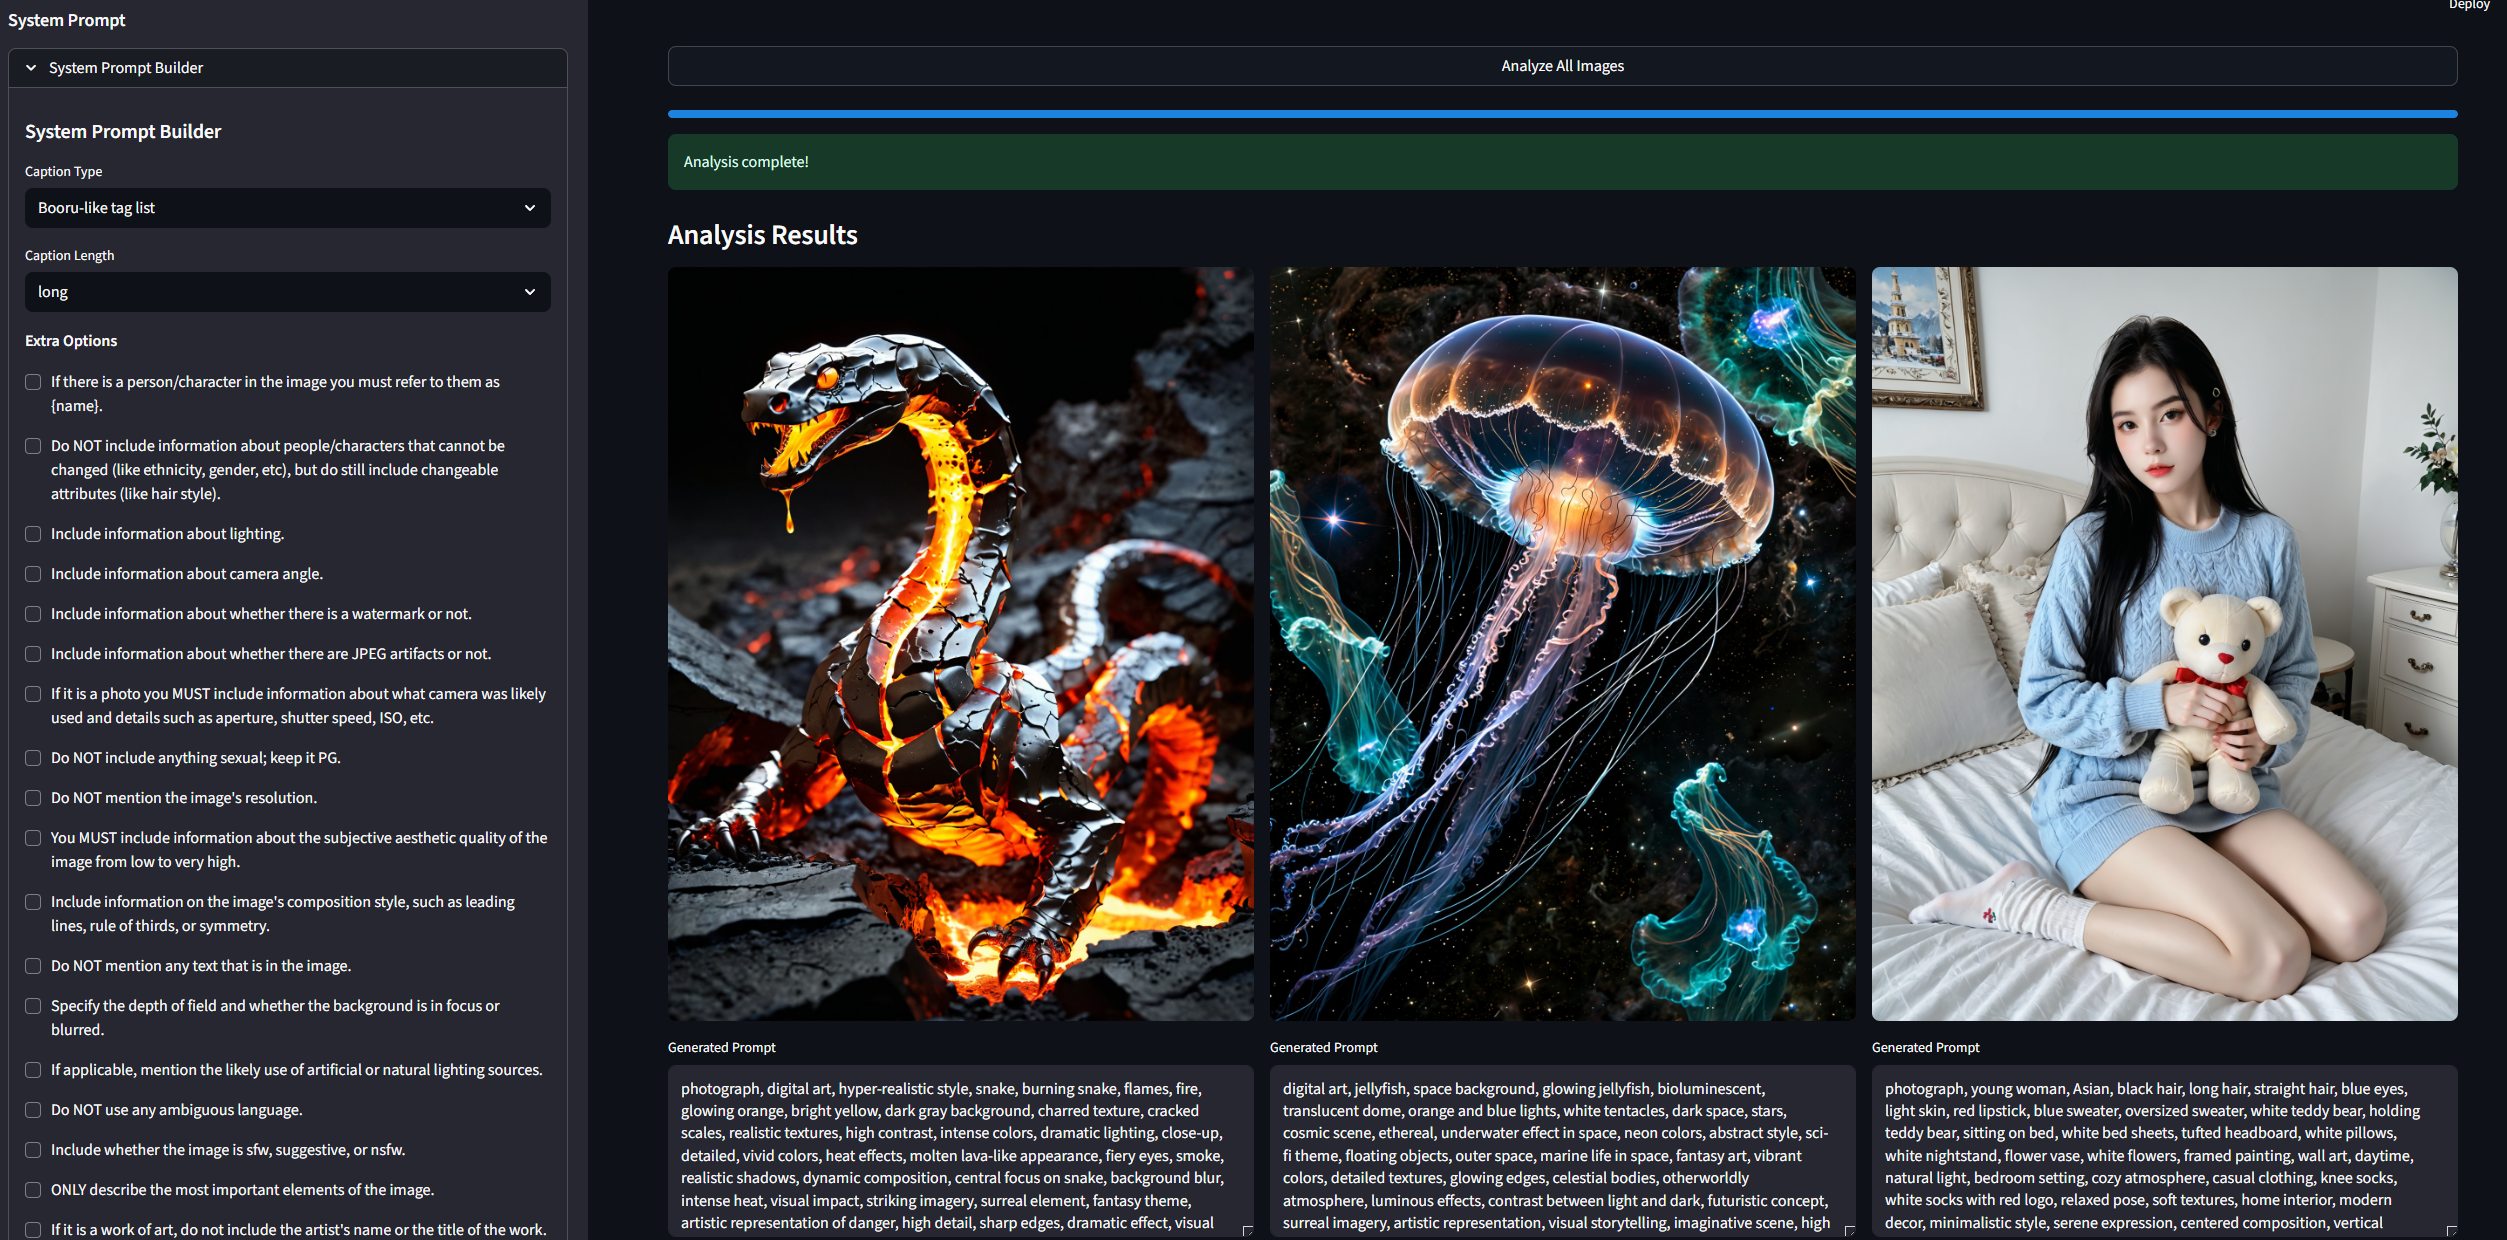
Bulk Analysis - Batch process entire folders of images
System Prompt Builder - Generate prompts with 11 caption types, 30 length options, and 25 extra options
Prompt Director Pro - AI image/video prompt writing helper with model-aware dropdowns for style, camera, lighting, composition, and video movement
Nano Banana Prompt Library - Curated prompt gallery with search, category filters, image thumbnails, and one-click copy or send-to-Image-Studio
PromptFill Template Authoring - Build reusable prompt systems with banks, variables, template tags, and media previews
Local Enhancer (new)
No Setup Required -prompt-enhancement backend is bundled inside the app. No Ollama, no third-party tools needed.
Quantization Backends - GGUF and Quanto INT8 supported for flexible VRAM usage.
Audio Understanding for Video Modes -, the enhancer analyzes attached video audio locally can incorporate dialogue, ambience, music, and sound effects into the rewritten prompt.

PromptFill
Switch to the PromptFill tab in the top navigation bar
Browse templates by search, type, and tag filters in the left sidebar
Select a template to open it in the visual editor
Fill variables by clicking any inline chip in the template body
Use Smart Terms in the picker dialog to generate AI suggestions for the current variable in the context of the full template
Add custom values when no existing bank option fits your use case
Edit template content with the Edit button to work directly with raw
{{variable}}placeholdersUse AI Smart Split from the AI tools menu to turn a plain prompt into a reusable template with extracted variables


Image Studio (Generation & Editing)
Text to Image - Create stunning visuals from descriptive prompts
Image to Image - Use reference images to guide style, composition, and content
Advanced Resolution - Select between 1K, 2K, and 4K output (model dependent)
Aspect Ratio Control - Standard 1:1, Landscape 16:9, or Portrait 9:16 support
Improve Prompt: Use the ✨ wand icon to have an LLM enhance your base prompt for better results

Veo Video Generation
Text to Video - Generate high-quality cinematic videos from text prompts
Image to Video - Use start and end images to guide video generation
Extend Video - Automatically extend existing videos by extracting the last frame and generating a continuation, then seamlessly merging them with FFmpeg
Prompt Enhancement - Built-in LLM-powered rewriter that uses attached images and video frames to create highly detailed cinematic prompts
Advanced Controls - Configure aspect ratio (16:9, 9:16) and resolution (720p, 1080p, 4K)

SVG Generator (new)
Text to SVG - Describe any object, icon, or scene and generate a fully self-contained SVG vector graphic
Animated SVG - Toggle to Animated mode to produce CSS-animated SVGs with looping
@keyframeseffectsReference Image - Attach an image as a visual reference; the AI recreates it in vector format
Export Options - Download as SVG, PNG, GIF, Animated PNG (APNG), MP4 (H.264), or MOV (lossless)
https://civitai.com/posts/27364776
Prompt Director Pro
A built-in prompt writing helper . Supports 9 AI models across image and video generation:

First Time Setup
Open the sidebar (hamburger menu icon)
Select API Provider (Ollama, LM Studio, Koboldcpp, or Google)
Configure provider settings:
For local providers: Set API base URL (default ports: Ollama=11434, LM Studio=1234, Koboldcpp=5001)
For Google: Enter API key
Fetch models using the "Fetch Models" button
Select one or more models from the available list
Choose or create a system prompt

Chat Interface
Upload images (optional): Click "Add Images" or drag-and-drop
Upload videos (Google only): Click "Add Videos"
Enter your message or click "Analyze Image(s)" for media-only analysis

Bulk Analysis

System Prompt Builder

Nano Banana Prompt Library

Recommended Models
Local Models (Ollama/LM Studio)
Llama JoyCaption Alpha One (12GB VRAM) - Best for system prompt builder
Gemma 3 27B (24GB VRAM) - High quality, complex scenes
Gemma 3 12B (8GB VRAM) - Balanced performance
Qwen2.5-VL-7B (8GB VRAM) - Excellent detail and instruction following
LLaVA 1.6 (8GB VRAM) - Popular open-source option
Google Gemini & Imagen Models (Cloud)
imagen-4.0-generate-001 - Latest Imagen 4 model for photorealistic results
gemini-3-pro-image-preview - High-quality reasoning + image generation
gemini-3-flash-image-preview - Fast, lightweight image generation
gemini-2.5-flash-image - Efficient and reliable image creation
gemini-3-flash-preview - Fast text/vision analysis
gemini-3-pro-preview - Best quality text/vision analysis